Bulbs
Flower Basics
Flower Beds & Specialty Gardens
Flower Garden
Garden Furniture
Garden Gnomes
Garden Seeds
Garden Sheds
Garden Statues
Garden Tools & Supplies
Gardening Basics
Green & Organic
Groundcovers & Vines
Growing Annuals
Growing Basil
Growing Beans
Growing Berries
Growing Blueberries
Growing Cactus
Growing Corn
Growing Cotton
Growing Edibles
Growing Flowers
Growing Garlic
Growing Grapes
Growing Grass
Growing Herbs
Growing Jasmine
Growing Mint
Growing Mushrooms
Orchids
Growing Peanuts
Growing Perennials
Growing Plants
Growing Rosemary
Growing Roses
Growing Strawberries
Growing Sunflowers
Growing Thyme
Growing Tomatoes
Growing Tulips
Growing Vegetables
Herb Basics
Herb Garden
Indoor Growing
Landscaping Basics
Landscaping Patios
Landscaping Plants
Landscaping Shrubs
Landscaping Trees
Landscaping Walks & Pathways
Lawn Basics
Lawn Maintenance
Lawn Mowers
Lawn Ornaments
Lawn Planting
Lawn Tools
Outdoor Growing
Overall Landscape Planning
Pests, Weeds & Problems
Plant Basics
Rock Garden
Rose Garden
Shrubs
Soil
Specialty Gardens
Trees
Vegetable Garden
Yard Maintenance
How to Build a Mini Greenhouse
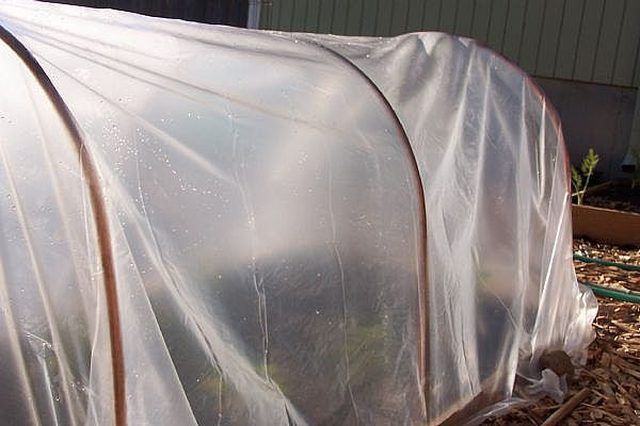
How to Build a Mini Greenhouse. Building a mini greenhouse in your garden is an inexpensive, easy, low-tech way to start gardening earlier in spring and to extend the gardening season well into fall. This greenhouse uses a hoop house design and it can be covered with plastic, row cover material or shade cloth, making it a versatile and useful...
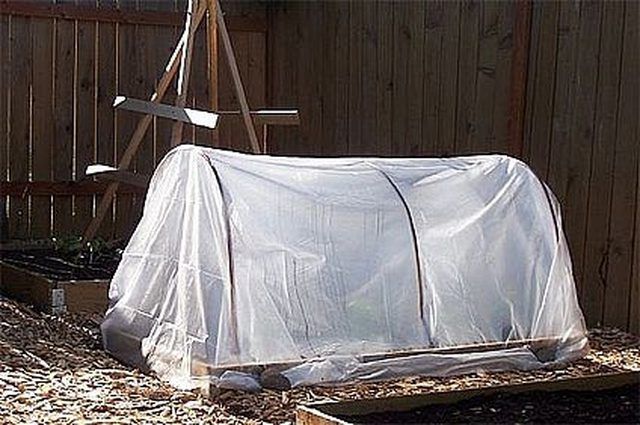
Building a mini greenhouse in your garden is an inexpensive, easy, low-tech way to start gardening earlier in spring and to extend the gardening season well into fall. This greenhouse uses a hoop house design and it can be covered with plastic, row cover material or shade cloth, making it a versatile and useful addition to the garden. The greenhouse takes under an hour to construct and uses materials that you can find in any hardware store. Here's how to make it.
Things You'll Need
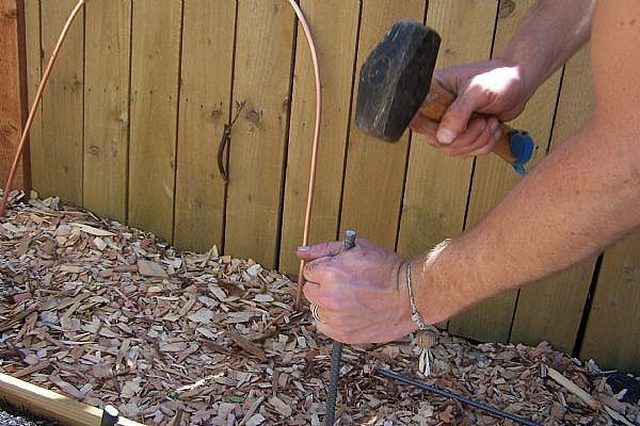
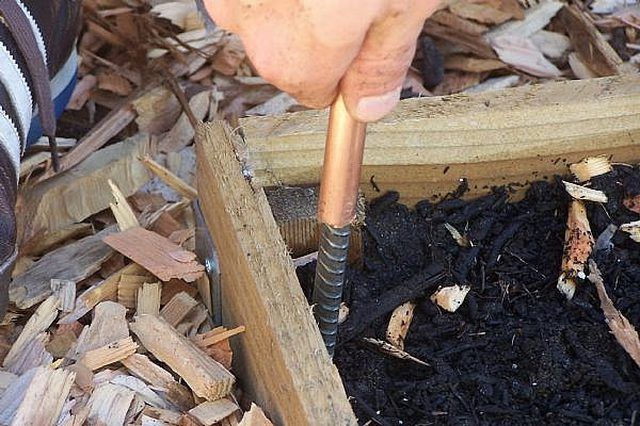
(6) 2-foot long 3/8-inch rebar stakes
18 feet of ?-inch flexible PVC or copper tubing
Mallet
Hack saw
Plastic sheeting, row cover or shade cloth
Scissors
Bricks
Two 6 foot long pieces of 1x1 wood (optional)
Staple gun (optional)
Install the rebar stakes that will support the hoops of the greenhouse. Place a stake in each corner of the bed and two adjacent from each other in the middle of the bed. Hammer each stake 18 inches into the ground with the mallet or a heavy hammer. (These directions are for a bed that is 6 feet long by 3 feet wide. If your bed is longer, simply add in additional hoops. You can build this greenhouse over both in-ground and raised beds.)
You can choose to use either PVC or flexible copper tubing. I chose to use copper because it is extremely durable and attractive. To make the hoops, cut the plastic or copper tubing into three 6-foot long sections with a hack saw.
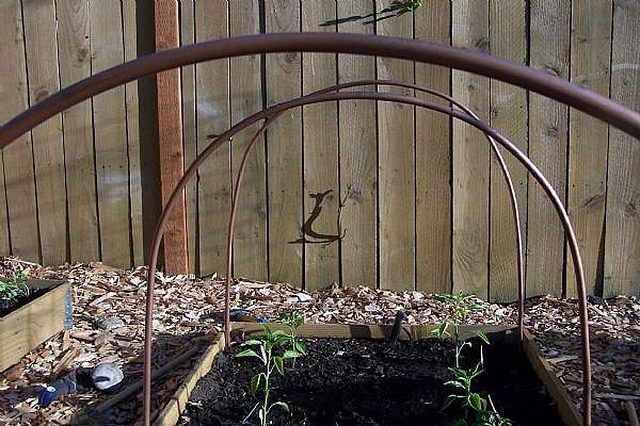
To create each hoop, just slide one end of the tubing over a stake, arch the tubing over the bed and slip the other end of the tubing over the stake on the other side of the bed. Repeat with the remaining lengths of tubing. You should end up with three hoops over the bed. (A 6-foot length of tubing will make a 2 ?-foot-tall arch when placed over a 3-foot-wide bed. If you want taller or shorter hoops, or if your bed is a different dimension, simply adjust the length of the tubing accordingly.)
Once the hoops are in place you can choose what you want to cover the frame with. Clear plastic is a good choice in early spring and fall because it holds in solar energy and can heat up the air inside the greenhouse 10 to 20 degrees F higher than ambient temperatures (watch out though, it can get too hot for plants on a sunny summer day). A row cover cloth (like Reemay, Agribon or Tufbell) lets in light and air, and keeps temperatures inside the greenhouse 3 to 10 degrees F warmer. Or in midsummer, you can place shade cloth over the frame to prevent sunscald on peppers or to grow crops like lettuce that prefer cooler temperatures.
Drape the plastic sheeting, row cover or shade cloth over the hoops and cut it to fit. You'll want an extra 18 to 24 inches of fabric on all sides so you can easily secure it.
You can weigh down the edges with bricks or rocks, or you can staple a 1x1 to the long edges of the plastic, fabric or row cover. Then, using the 1x1 as a spool, roll up the excess material (towards the greenhouse). The weight of the material and the 1X1 will hold the cover in place. Weigh the excess material down at either end of the house with bricks. If you live in a windy area, you may want to clip the plastic to the hoops with large binder clips (or you can purchase special row cover clips from Peaceful Valley Farm Supply, see Resources below).
Tips & Warnings
Plants tend to dry out more quickly when in the greenhouse, so be sure to check them often.
If you grow plants that need insect pollination to produce fruit (such as squash and cucumbers) in the greenhouse, you'll need to remove the cover when the plants begin to flower so pollinators can access them.


