Bulbs
Flower Basics
Flower Beds & Specialty Gardens
Flower Garden
Garden Furniture
Garden Gnomes
Garden Seeds
Garden Sheds
Garden Statues
Garden Tools & Supplies
Gardening Basics
Green & Organic
Groundcovers & Vines
Growing Annuals
Growing Basil
Growing Beans
Growing Berries
Growing Blueberries
Growing Cactus
Growing Corn
Growing Cotton
Growing Edibles
Growing Flowers
Growing Garlic
Growing Grapes
Growing Grass
Growing Herbs
Growing Jasmine
Growing Mint
Growing Mushrooms
Orchids
Growing Peanuts
Growing Perennials
Growing Plants
Growing Rosemary
Growing Roses
Growing Strawberries
Growing Sunflowers
Growing Thyme
Growing Tomatoes
Growing Tulips
Growing Vegetables
Herb Basics
Herb Garden
Indoor Growing
Landscaping Basics
Landscaping Patios
Landscaping Plants
Landscaping Shrubs
Landscaping Trees
Landscaping Walks & Pathways
Lawn Basics
Lawn Maintenance
Lawn Mowers
Lawn Ornaments
Lawn Planting
Lawn Tools
Outdoor Growing
Overall Landscape Planning
Pests, Weeds & Problems
Plant Basics
Rock Garden
Rose Garden
Shrubs
Soil
Specialty Gardens
Trees
Vegetable Garden
Yard Maintenance
How to Make Log Benches
How to Make Log Benches. A log bench entails no more than a log split in half and fitted with legs. You have two basic options for legs: Horizontal at the bottom -- a kind of sled base -- or vertical legs attached like a traditional bench. Either way, this durable bench is heavy-duty. Its rustic look fits in on a patio, garden, recreation room or...
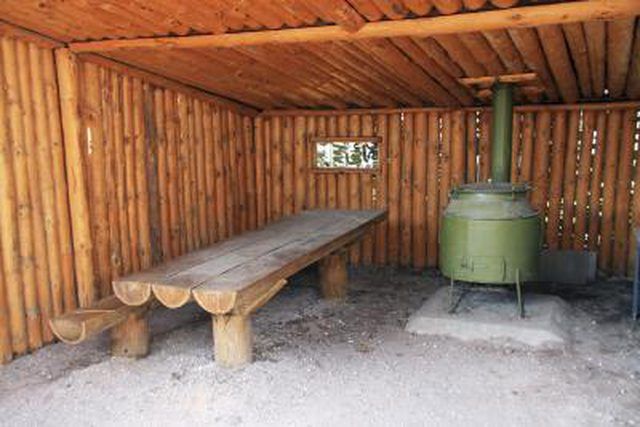
A log bench entails no more than a log split in half and fitted with legs. You have two basic options for legs: Horizontal at the bottom -- a kind of sled base -- or vertical legs attached like a traditional bench. Either way, this durable bench is heavy-duty. Its rustic look fits in on a patio, garden, recreation room or den. Splitting logs lengthwise is very difficult if not impossible using ordinary tools. Sawmills use gigantic equipment to split logs. Get your hands on one after it's split and add the legs.
Things You'll Need
Split log, 12-inch diameter
2 logs, 10-inch diameter
Lumber crayon
Chainsaw
2-inch chisel
Mallet or hammer
1/4-inch drill bit
Lag bolts, 5/16-by-4-inch
3/8-inch socket
Ratchet
2-inch tenon cutter
Drill/driver, 1/2-inch chuck
Clamp
4 logs, 3?-inch diameter, 16 inches long
2-inch Forstner bit
Resin glue
Rubber mallet
Straightedge, 1?-inch width
Reciprocating saw
Place the split log face up, perpendicular to the two 24-inch logs that will serve as supports. The supports should be centered 18 inches from each end.
Draw a half-circle with a lumber crayon on the split log at the point where the split log contacts the support logs. The half-circle curve should mirror the curve in the smaller logs as close as possible. The curve should be about 5 inches deep at the highest point.
Remove the split log from the support logs. Turn it face down. Cut the rough size of the curve with a chainsaw. Make a series of vertical cuts side by side to the curved line. Cut across at a slight angle to remove the pieces. Remove as much of the material as possible without cutting through the line. It doesn't have to be perfect.
Chisel the curve out to define it using a 2-inch chisel and mallet. Test fit the split log by placing it on the shorter logs. Continue chiseling and testing until the logs fit together snugly.
Drill one hole on each side of the split log, 2 inches from the contact point at the apex of the curve. Angle a 1/4-inch drill bit at 30 degrees to penetrate through the side of the split log into the 24-inch log below it to a depth of no more than 1 inch.
Insert 5/16-by-4-inch lag bolts in the holes. Drive the lag bolts in using a 3/8-inch socket and ratchet.
Tenon Method
Install a 2-inch tenon cutter into a drill with a 1/2-inch chuck. Clamp one of the 3 1/2-by-16-inch logs to a worktable, with one end extending over the edge of the table.
Position the end of the tenon cutter on the end of the log. Turn on the drill and push the end of the tenon cutter over the end of the log slowly until it stops. Remove the clamp. Do one end of all four 3 1/2-by-16-inch legs.
Place the split log face down. Mark two holes for legs, 8 inches apart, 18 inches from both ends. Drill holes at the marks using a drill with a 1/2-inch chuck and a 2-inch Forstner bit.
Mix water with powdered resin glue according to directions printed on the packaging. Apply glue to the holes and the tenons. Insert the tenons in the holes. Drive the legs into the holes with a rubber mallet. Allow the glue to dry overnight.
Stand the bench on its legs on a flat surface. Place a 1 1/2-inch wide straightedge on the flat surface, on edge against one of the legs. Trace the line of the straightedge across the leg, transferring the angle of the flat surface to the leg.
Flip the bench upside down with the legs in the air. Cut the legs off at the angle using a reciprocating saw. Turn the bench on its feet. Check for level by rocking the bench. Trim the leg or legs as needed with the saw to level the bench.


