Bulbs
Flower Basics
Flower Beds & Specialty Gardens
Flower Garden
Garden Furniture
Garden Gnomes
Garden Seeds
Garden Sheds
Garden Statues
Garden Tools & Supplies
Gardening Basics
Green & Organic
Groundcovers & Vines
Growing Annuals
Growing Basil
Growing Beans
Growing Berries
Growing Blueberries
Growing Cactus
Growing Corn
Growing Cotton
Growing Edibles
Growing Flowers
Growing Garlic
Growing Grapes
Growing Grass
Growing Herbs
Growing Jasmine
Growing Mint
Growing Mushrooms
Orchids
Growing Peanuts
Growing Perennials
Growing Plants
Growing Rosemary
Growing Roses
Growing Strawberries
Growing Sunflowers
Growing Thyme
Growing Tomatoes
Growing Tulips
Growing Vegetables
Herb Basics
Herb Garden
Indoor Growing
Landscaping Basics
Landscaping Patios
Landscaping Plants
Landscaping Shrubs
Landscaping Trees
Landscaping Walks & Pathways
Lawn Basics
Lawn Maintenance
Lawn Mowers
Lawn Ornaments
Lawn Planting
Lawn Tools
Outdoor Growing
Overall Landscape Planning
Pests, Weeds & Problems
Plant Basics
Rock Garden
Rose Garden
Shrubs
Soil
Specialty Gardens
Trees
Vegetable Garden
Yard Maintenance
How to Build Stone Block Steps on a Hillside
How to Build Stone Block Steps on a Hillside. Stone block steps are a beautiful addition on a hillside. They provide easier access from hilltop to ground level than a dirt or grass path and also prevent erosion. Stone blocks come in a variety of shapes and colors. You can create intriguing patterns and effects, including scalloped kick plates,...

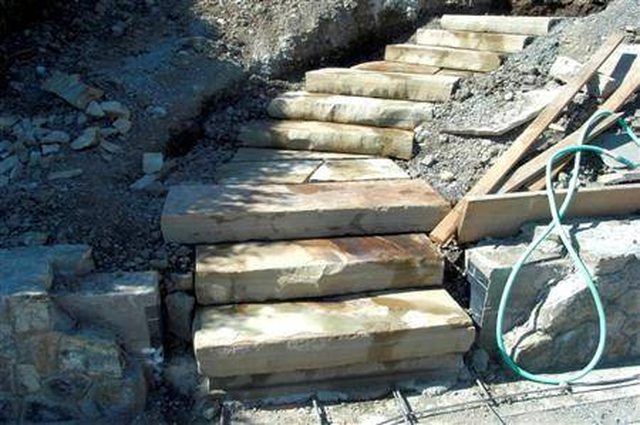
Stone block steps are a beautiful addition on a hillside. They provide easier access from hilltop to ground level than a dirt or grass path and also prevent erosion. Stone blocks come in a variety of shapes and colors. You can create intriguing patterns and effects, including scalloped kick plates, curved landings and crenelated borders.
A stone block staircase can be designed to draw the eye to a particular point in the yard, such as an ornamental planting, terrace garden or water feature. Block ends can be exposed, or they can be hidden by overhanging border flowers, softening the formality of the straight lines and rough surfaces.
Things You'll Need
Stone blocks of your choice of sizes, shapes and colors
Shovel
Hoe
Gravel, sand
2 by 6 inch lumber
Power plate compactor
Check with your local building department before designing your stairway. Obtain all necessary permits before proceeding. Decide whether you want your stone block steps to go straight up the hill, switch back and forth from one landing to another, or flow uphill in a gentle curve. A staircase with multiple landings is easier to climb and provides space for several mini patio gardens which you can landscape with flowers and ornamental shrubs. These mini gardens will draw song birds and beneficial insects such as butterflies, bees, ladybugs and praying mantis.
A flowing, curved staircase or a switchback stair will both increase the aesthetic appeal of your hillside from the street. A straight stone block staircase, flowing uninterrupted up the hill, will require less labor and fewer materials, but will not increase the curb appeal of your hillside nearly as much.
Begin digging at the bottom of the hillside. Cut into the hill at a 90-degree angle to make a level surface, as deep from front to back as the length of the stone blocks. Make each stair wide enough for two people to pass one another without touching, about 4 to 6 feet.
Spread sand across the first cut into the hillside. Use a power plate compactor to compact the sand and dirt. This will prevent uneven settling after the installation of your stone block steps.
Lay each stone block with the length going from front to back on the stair. If you are using hexagonal, petal-shaped, pentagonal or square blocks, be sure they provide 10 to 12 inches of tread space. This is the minimum safe tread depth for a hillside stair. Backfill each step with sand and gravel. Use a power plate compactor again to ensure they will not settle later.
Repeat this process for each step until you reach the first landing, or continue to the top if you are not including any landings at all. Reposition and compact blocks as needed before proceeding.
Create landings as needed each time you reach 8 feet of rise in your hillside steps. Lay stone block as you would for a patio. Dig down six to eight inches, the length and width of your landing. Build a form using 2 by 6 inch lumber and fill it in with gravel. Compact the gravel until level with the top edge of the form, then backfill form with sand and compact again. Lay your stone block in the desired pattern.
Lay an ornamental patio at the top if space permits.
Tips & Warnings
Use a mask and gloves when working with the power compactor.
Wear eye protection at all times when working with power tools.
ALWAYS CHECK WITH YOUR LOCAL BUILDING DEPARTMENT BEFORE DESIGNING A STAIRWAY, AND FOLLOW ALL LOCAL CODES.