Bulbs
Flower Basics
Flower Beds & Specialty Gardens
Flower Garden
Garden Furniture
Garden Gnomes
Garden Seeds
Garden Sheds
Garden Statues
Garden Tools & Supplies
Gardening Basics
Green & Organic
Groundcovers & Vines
Growing Annuals
Growing Basil
Growing Beans
Growing Berries
Growing Blueberries
Growing Cactus
Growing Corn
Growing Cotton
Growing Edibles
Growing Flowers
Growing Garlic
Growing Grapes
Growing Grass
Growing Herbs
Growing Jasmine
Growing Mint
Growing Mushrooms
Orchids
Growing Peanuts
Growing Perennials
Growing Plants
Growing Rosemary
Growing Roses
Growing Strawberries
Growing Sunflowers
Growing Thyme
Growing Tomatoes
Growing Tulips
Growing Vegetables
Herb Basics
Herb Garden
Indoor Growing
Landscaping Basics
Landscaping Patios
Landscaping Plants
Landscaping Shrubs
Landscaping Trees
Landscaping Walks & Pathways
Lawn Basics
Lawn Maintenance
Lawn Mowers
Lawn Ornaments
Lawn Planting
Lawn Tools
Outdoor Growing
Overall Landscape Planning
Pests, Weeds & Problems
Plant Basics
Rock Garden
Rose Garden
Shrubs
Soil
Specialty Gardens
Trees
Vegetable Garden
Yard Maintenance
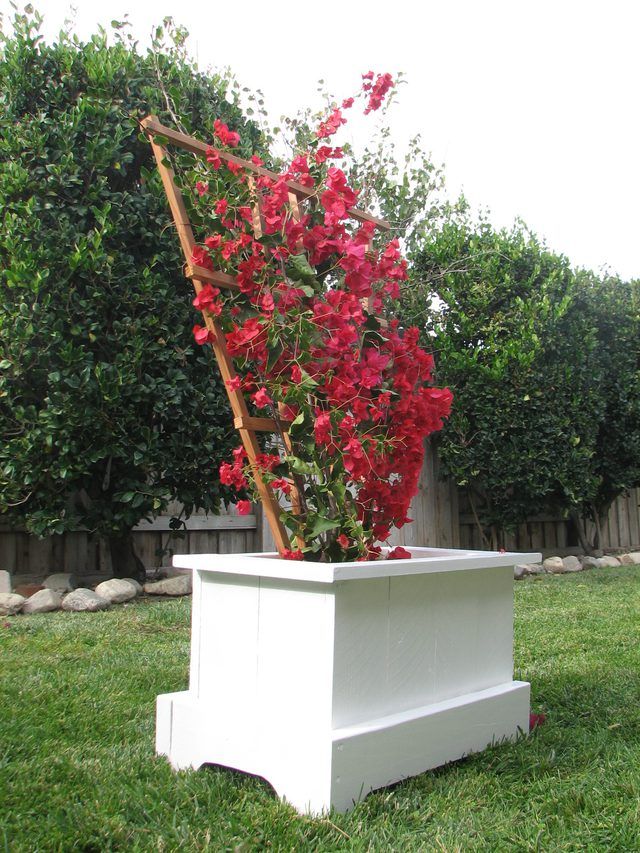
How to Build a Garden Planter Box
How to Build a Garden Planter Box. A garden planter box lends an elegant touch to your yard or patio, especially when painted or stained to complement your existing outdoor decor. You can attach a trellis to the back of the planter box to grow climbing vine-type plants, which adds drama and height to your space. Because it is not fastened to a wall...
A garden planter box lends an elegant touch to your yard or patio, especially when painted or stained to complement your existing outdoor decor. You can attach a trellis to the back of the planter box to grow climbing vine-type plants, which adds drama and height to your space. Because it is not fastened to a wall or the ground, the planter box can be placed in different locations, depending on what you plant in it each year.
Things You'll Need
**For the Planter Box:**
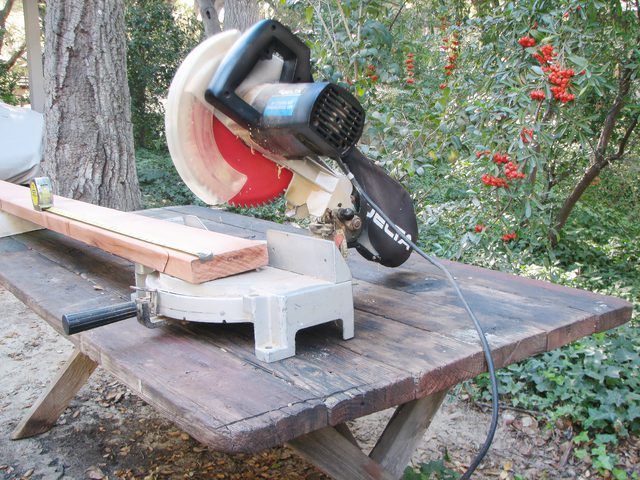
Skilsaw
Power drill
Yardstick or straightedge
Jigsaw
Miter box or saw
Clamps
Wood glue
3 cedar one-by-sixes, 6 feet
2 cedar one-by-twos, 6 feet
1 cedar two-by-six, 8 feet
1 cedar one-by-four, 8 feet
68 galvanized deck screws, 1 1/4 inches
12 galvanized deck screws, 2 1/2 inches
Drill bit, 1/2 inch
Soup can
Try square (optional)
Sandpaper, 120-grit (optional)
Exterior paint or wood stain (optional)
**For the Trellis:**
3 cedar one-by-ones, 8 feet
Staple gun
1 box of galvanized staples, 1 1/2 inches
Step 1
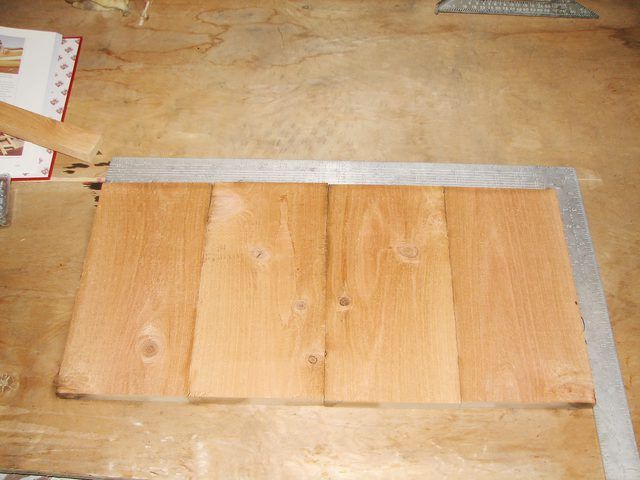
Cut two of the fence panels into 12 panels that are each 11 inches high.
Step 2
Arrange the panels into two groups of four, for the front and back of the box, and two groups of two (the sides of the box). Lay each group flat and make sure the tops and bottoms are flush as they are set vertically. You can also use a try square to ensure the panels are flush.
Step 3
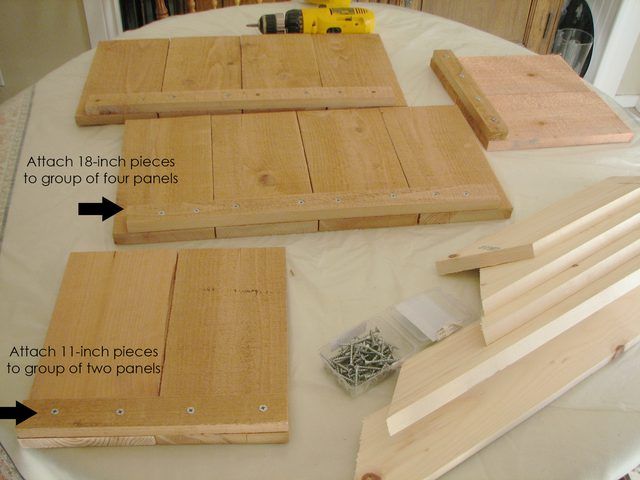
Cut a one-by-two into four pieces that are 18 1/2 inches long and four pieces that are 11 inches long.
Step 4
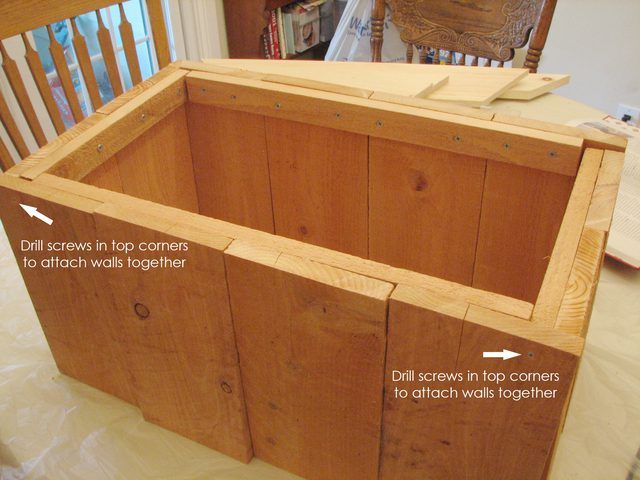
Place one of the 18 1/2-inch pieces horizontally on top of a group of four panels, centering it along the top edge of the panels with equal empty space on each end. Check that it is flush, and use the power drill to drive two 1 1/4-inch deck screws into each panel (starting at the ends). Place another 18 1/2-inch piece at the bottom edge of the four panels, except move it up to leave 1 inch of space below it. Attach it to the panels with another eight 1 1/4-inch deck screws. Repeat these steps with the other 18 1/2-inch pieces and group of four panels, and then the 11-inch pieces and groups of two panels. You have just built the four walls of the planter box.
Step 5
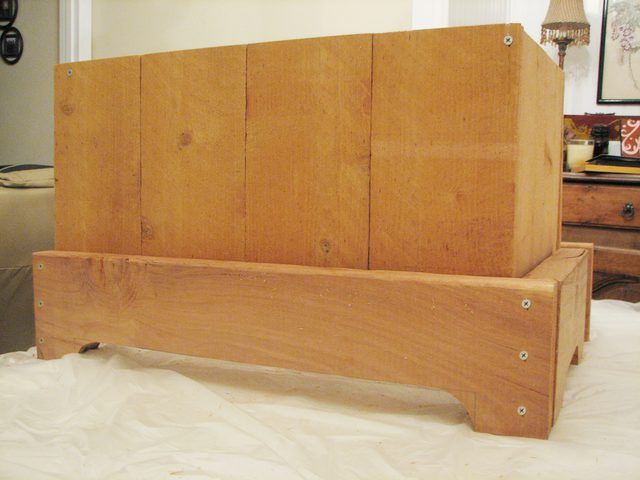
When done with all four walls, stand them all upright and arrange them to form a flush rectangular box, with the one-by-twos on the inside. Apply wood glue to the joints to attach the four walls together, and drill 1 1/4-inch deck screws through the top corners of the box, going through the larger walls of the box into the smaller walls (total of four screws). Drill screws in far enough to hit the one-by-twos on the inside of the box, preventing any wood from splitting.
Step 6
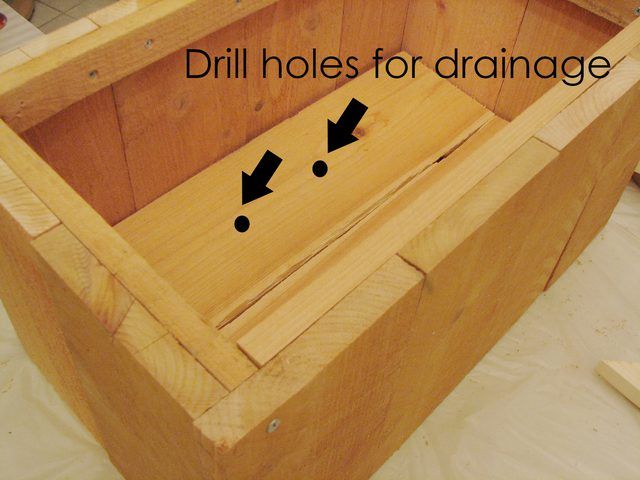
Cut the remaining fence panel into two panels that are 20 1/2 inches long. Place both panels into the bottom of the planter box so they rest side-by-side on top of the one-by-twos. Use a 1/2-inch drill bit to drill two holes into the centers of these two panels for drainage.
Step 7
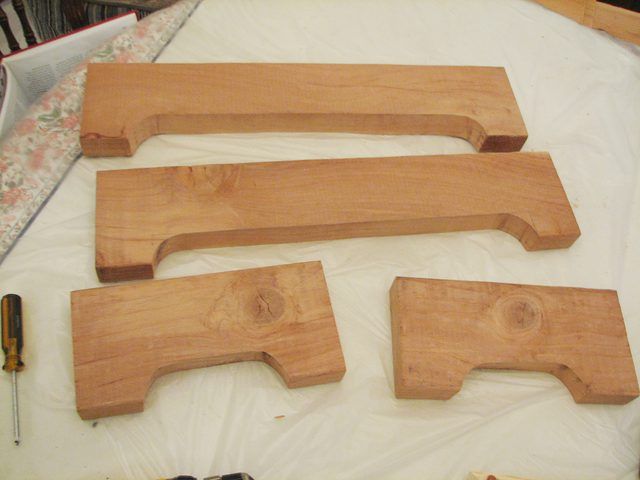
It's time to build the base, which is a scalloped frame that creates feet in each corner of the bin. Cut the two-by-six into two pieces that are 16 inches long and two pieces that are 13 inches long. These pieces will be the legs of the base. On one of the 16-inch pieces, measure and mark a point on each side that is 2 inches in from the side and 1 inch up from the bottom. Use a pencil and straightedge to connect these points into a rectangle. Next, draw the contours for the scallops by taking a soup can and tracing around it to create a curved shape at both sides of the rectangle. Make sure the edges of the can are touching the top and sides of the rectangle before you trace. Use a jigsaw to cut out the scalloped rectangle, following the curved edge you penciled in with the soup can.

Step 8
Repeat these steps with the other 16-inch leg and the two 13-inch legs. Now, you have four scalloped legs.
Step 9
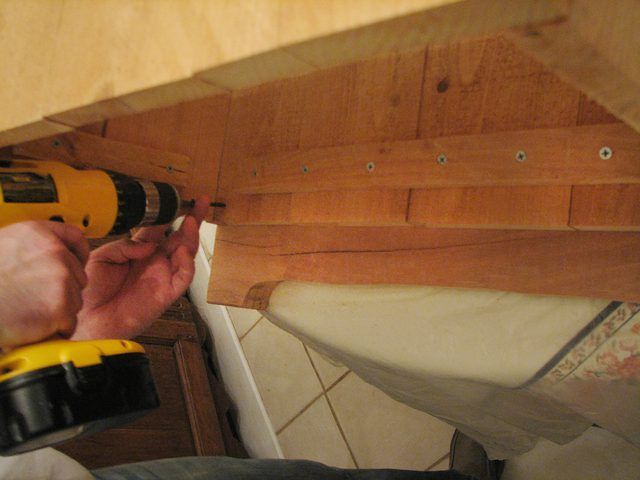
To attach the legs to the bin, lay the bin on its long side on top of a 16-inch scalloped leg. Position the bin so that it overlaps 7/8 inches with the top edge of the scalloped leg. Drill in four 1 1/4-inch deck screws to secure the bin to the leg (one screw in each corner and two in the middle). Repeat with the other three legs.
Step 10
Now, use 2 1/2-inch deck screws to drill the scalloped legs together, drilling through the larger legs into the smaller legs (12 screws total, three in each corner).
Step 11
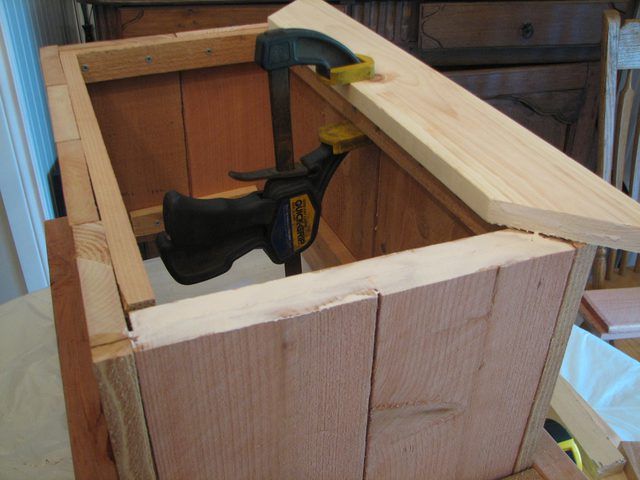
The top of the bin is capped off with a wood trim. Use the Skilsaw to cut the one-by-four into one piece that is 18 inches long and two pieces that are 10 1/2 inches long. Use the miter box/saw to cut both ends of the 18-inch piece at 45-degree outward angles. This will be the front piece of trim. Use the miter box/saw to cut one end on both of the 10 1/2-inch pieces at a 45-degree outward angle (leaving the other end straight on both pieces). Use the remaining one-by-two to cut a piece that is 18 1/2 inches long. This will be the back piece of trim. Use a liberal amount of wood glue to connect the front piece of trim to the bin and secure it with clamps. Wait for the glue to dry before starting the next pieces. Glue the side pieces of trim and secure with clamps. Once dry, glue the back piece to complete the wood trim and secure with clamps until dry.
Step 12
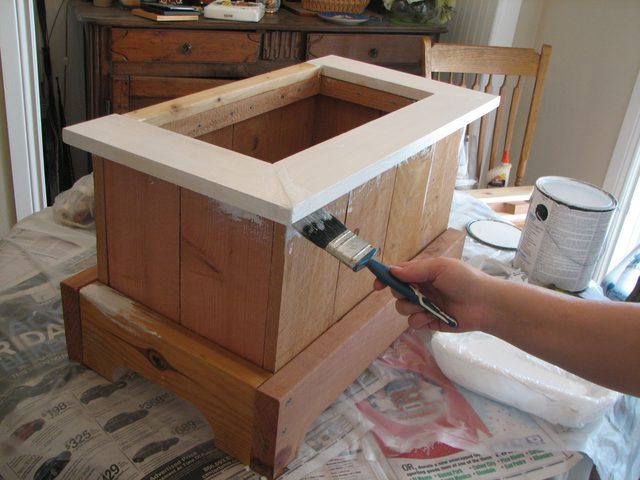
If you want to paint or stain your planter, sand it, following the grain of the wood. Wipe it down to remove dust particles and then either paint or stain it with your color of choice.
Step 1
Cut the one-by-ones into four 3-foot long pieces (these will be the vertical pieces) as well as one 30-inch, 24-inch, 18-inch and 12-inch long pieces (these will be the horizontal pieces).

Step 2
Lay the horizontal pieces flat, placed 10 inches apart, with the longest piece at the top and the smallest piece at the bottom. Next, lay the four vertical pieces on top of the horizontal pieces. Each of the vertical pieces should stick 1 inch above the top horizontal piece. The vertical pieces on the left and right should be placed 2 inches inward from the sides. Staple each intersection.
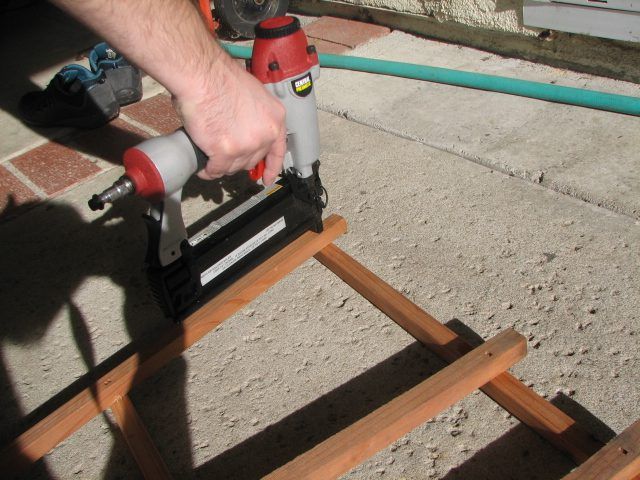
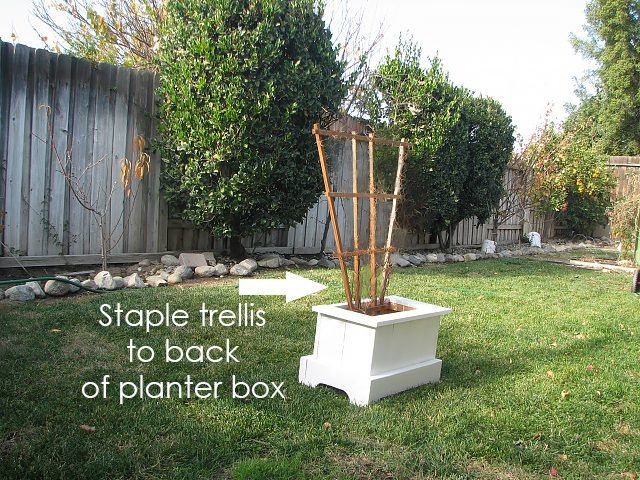
Step 3
Staple the bottom horizontal piece of the trellis to the inside back of the planter bin -- approximately four or five staples should be sufficient.


