Bulbs
Flower Basics
Flower Beds & Specialty Gardens
Flower Garden
Garden Furniture
Garden Gnomes
Garden Seeds
Garden Sheds
Garden Statues
Garden Tools & Supplies
Gardening Basics
Green & Organic
Groundcovers & Vines
Growing Annuals
Growing Basil
Growing Beans
Growing Berries
Growing Blueberries
Growing Cactus
Growing Corn
Growing Cotton
Growing Edibles
Growing Flowers
Growing Garlic
Growing Grapes
Growing Grass
Growing Herbs
Growing Jasmine
Growing Mint
Growing Mushrooms
Orchids
Growing Peanuts
Growing Perennials
Growing Plants
Growing Rosemary
Growing Roses
Growing Strawberries
Growing Sunflowers
Growing Thyme
Growing Tomatoes
Growing Tulips
Growing Vegetables
Herb Basics
Herb Garden
Indoor Growing
Landscaping Basics
Landscaping Patios
Landscaping Plants
Landscaping Shrubs
Landscaping Trees
Landscaping Walks & Pathways
Lawn Basics
Lawn Maintenance
Lawn Mowers
Lawn Ornaments
Lawn Planting
Lawn Tools
Outdoor Growing
Overall Landscape Planning
Pests, Weeds & Problems
Plant Basics
Rock Garden
Rose Garden
Shrubs
Soil
Specialty Gardens
Trees
Vegetable Garden
Yard Maintenance
How to Splice Low Voltage Landscape Lighting Wire
How to Splice Low Voltage Landscape Lighting Wire. Low-voltage landscape lighting systems are a great way to add accent lighting to your yard or garden. Systems will typically come with pre-cut lengths of wire, which can limit your placement of accent lights. To extend the low-voltage landscape lighting wires, you can splice in additional sections...
Low-voltage landscape lighting systems are a great way to add accent lighting to your yard or garden. Systems will typically come with pre-cut lengths of wire, which can limit your placement of accent lights. To extend the low-voltage landscape lighting wires, you can splice in additional sections of wire.
Things You'll Need
Low voltage lighting system
Wire cutters/strippers
Two-lead electrical wire
Heat-shrink tubing
Soldering iron
Rosin-core solder
Blow drier
Stretch out the existing low voltage landscape lighting wire (make sure it's disconnected from any power source first). Cut the wire in the middle with a pair of wire cutters.
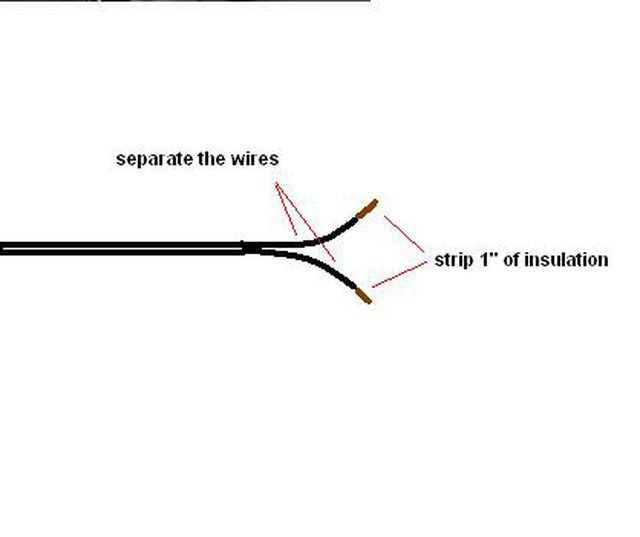
Strip the insulation from each of the cut ends of the wire, so that each wire's leads have about 1 inch of bare wire exposed. Pull apart the leads of each wire so that they are separated from each other for about 4-6 inches.

Take the wire you'll be inserting into the circuit. It should be of a similar gauge and construction. Cut a length that's long enough so that when inserted between the cut sections of the original wire you'll have enough wire to place your light in its destination. As in Step 2, separate the leads of the wire on the ends and strip about 1 inch of insulation from the leads.
On each of the leads of the new piece of wire, slide on a 2 inch long piece of heat-shrink tubing. There will be four pieces in total--two on each end of the new piece of wire.
Twist together the old and new wires to create a continuous length of two-lead wire. At each joint, apply a hot soldering iron, heat the wire, and then apply solder until it flows into the joint. Remove the soldering iron and repeat.
When the joints are cool, slide the pieces of heat-shrink tubing over the joints and direct the heat of a blow drier onto the tubing until it shrinks tight over the joints.
Plug your low-voltage system in and test operation, then place the wire and lighting fixtures as required.
Tips & Warnings
Heat shrink tubing will protect the splices you've made much more effectively than electrical tape, especially in the outdoors.
Even though this is a low-voltage application, don't work on live electrical circuits.


