Bulbs
Flower Basics
Flower Beds & Specialty Gardens
Flower Garden
Garden Furniture
Garden Gnomes
Garden Seeds
Garden Sheds
Garden Statues
Garden Tools & Supplies
Gardening Basics
Green & Organic
Groundcovers & Vines
Growing Annuals
Growing Basil
Growing Beans
Growing Berries
Growing Blueberries
Growing Cactus
Growing Corn
Growing Cotton
Growing Edibles
Growing Flowers
Growing Garlic
Growing Grapes
Growing Grass
Growing Herbs
Growing Jasmine
Growing Mint
Growing Mushrooms
Orchids
Growing Peanuts
Growing Perennials
Growing Plants
Growing Rosemary
Growing Roses
Growing Strawberries
Growing Sunflowers
Growing Thyme
Growing Tomatoes
Growing Tulips
Growing Vegetables
Herb Basics
Herb Garden
Indoor Growing
Landscaping Basics
Landscaping Patios
Landscaping Plants
Landscaping Shrubs
Landscaping Trees
Landscaping Walks & Pathways
Lawn Basics
Lawn Maintenance
Lawn Mowers
Lawn Ornaments
Lawn Planting
Lawn Tools
Outdoor Growing
Overall Landscape Planning
Pests, Weeds & Problems
Plant Basics
Rock Garden
Rose Garden
Shrubs
Soil
Specialty Gardens
Trees
Vegetable Garden
Yard Maintenance
How to Start a Redbud Tree
How to Start a Redbud Tree. Redbud trees (Cercis spp.) make clusters of 1/2-inch-long flowers in shades of pink, purple and white directly on their trunks and branches in spring, before their 3- to 5-inch heart-shaped leaves appear. The blooms are followed by 1 1/2- to 4-inch-long reddish brown seed pods. Growing from 15 to 40 feet and ranging in...
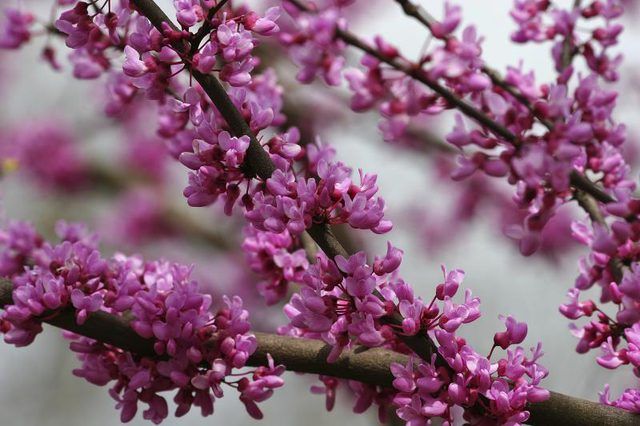
Redbud trees (Cercis spp.) make clusters of 1/2-inch-long flowers in shades of pink, purple and white directly on their trunks and branches in spring, before their 3- to 5-inch heart-shaped leaves appear. The blooms are followed by 1 1/2- to 4-inch-long reddish brown seed pods. Growing from 15 to 40 feet and ranging in hardiness from U.S. Department of Agriculture plant hardiness zones 5 through 9, redbuds can be difficult to propagate, either from seeds or cuttings.
Harvest Redbud Seeds
When harvesting seeds, keep in mind that those from a species type of redbud such as eastern redbud (Cercis canadensis) will produce seedlings that look like their parent tree, as will seeds from a "variety" such as Texas redbud (Cercis canadensis var. texensis). However, cultivars -- hybrids or mutations with names in capitals and quotes such as Cercis canadensis "Forest Pansy" -- won�t come true from seed. All these types are hardy in USDA zones 5 through 9.
You can harvest redbud seeds between July and October, after the seed pods have dried to a tan color. The light or dark brown seeds are typically round, flat and about 1/4-inch in diameter. After removing them from their pods, dry them on paper towels before storing them in a small covered glass jar in your refrigerator until late winter.
Prepare Redbud Seeds
Three months before your last frost date, scarify the seeds by lining the jar with sandpaper and shaking the seeds inside of it until their glossy surfaces look scuffed. Afterwards, soak the seeds in hot water that is about 82 degrees Fahrenheit when applied, for 24 hours.
Discard the seeds that didn�t sink in the water, as they aren't likely to be viable. Give the ones that did sink another hot water soak for an additional 24 hours, to allow them to swell. Should the seeds still remain at their original size, place them in a heat-proof container, pour boiling water over them and allow them to sit in the cooling water for 24 hours.
Once the seeds have swollen somewhat, place them in a zipper-type plastic bag, along with a handful of damp sand. Zip the bag shut and place it in your refrigerator for 2 months.
Sow Redbud Seeds
One month before your last frost date, remove the seeds from the bag and plant them outdoors 1/4 inch deep in rich, sandy, well-drained soil in full sun. If your ground is heavy clay instead, dig 1 inch each of coarse sand and compost into the top 6 inches of that ground before you plant the seeds.
As redbuds resent transplanting, sow the seeds where you want the trees to stay, spacing them at least 15 feet apart. Since the redbud's germination can be erratic, you may want to plant several seeds a few inches apart in each area and save only the most vigorous seedling in each planting after they sprout.
If you keep their soil damp, some of the seeds should sprout within three to four weeks. Redbud seedlings generally won't flower until they are 3 to 4 years old.
Take Redbud Cuttings
Since shoots from mature redbud trees don�t root well, get your cuttings from a young seedling or sapling which hasn�t yet reached blooming age. Take them in late spring or early summer from growth that is still green but firm enough to snap easily.
After cleaning the blades of your pruning shears with rubbing alcohol, snip 4-inch pieces from the tips of shoots in early morning, cutting each one at a 45-degree angle beneath a leaf node. Remove any leaves from the lower one-third of the cuttings and dip their bases in a rooting solution, prepared by mixing 1 part of a liquid rooting hormone with 20 parts of water � or whatever amount is indicated for softwood cuttings on the label's instructions.
Root Redbud Cuttings
Insert the cuttings into a pot filled with a mix of 1 part peat moss and 1 part sand, so that they stand upright with the lower one-third of each cutting beneath the surface of the mix. Space the cuttings far enough apart that their leaves don�t touch and cover the pot with an inverted clear plastic bag, supported by short stakes to keep it from resting against the cuttings� leaves.
Place the pot in a position with temperatures between 72 and 75 degrees Fahrenheit, where it will receive bright, indirect light � no direct sun. Leave it undisturbed for about a month, making sure that the mix remains damp during that time. At the end of the month, test the cuttings by tugging lightly on them to determine whether they are still loose in the soil or anchored by roots. If they appear to be rooted, gradually remove the bag for a longer and longer period of time each day, until the cuttings become accustomed to a less humid atmosphere.
You then may begin to expose the cuttings to a little more sunlight each day until they are growing happily in full sun. At that point, ease them apart -- keeping as much of the potting medium with each one as possible to avoid disturbing its roots -- and transplant them into the ground, watering them well and spacing them at least 15 feet apart.
Care for Saplings
After your seedlings or rooted cuttings are established and growing in the ground, water them deeply about once a week. Make a 1-foot-diameter circle of mulch 2 inches deep around each sapling, to suppress weeds and retain moisture, but don't allow mulch to contact the saplings' stems.


