Bulbs
Flower Basics
Flower Beds & Specialty Gardens
Flower Garden
Garden Furniture
Garden Gnomes
Garden Seeds
Garden Sheds
Garden Statues
Garden Tools & Supplies
Gardening Basics
Green & Organic
Groundcovers & Vines
Growing Annuals
Growing Basil
Growing Beans
Growing Berries
Growing Blueberries
Growing Cactus
Growing Corn
Growing Cotton
Growing Edibles
Growing Flowers
Growing Garlic
Growing Grapes
Growing Grass
Growing Herbs
Growing Jasmine
Growing Mint
Growing Mushrooms
Orchids
Growing Peanuts
Growing Perennials
Growing Plants
Growing Rosemary
Growing Roses
Growing Strawberries
Growing Sunflowers
Growing Thyme
Growing Tomatoes
Growing Tulips
Growing Vegetables
Herb Basics
Herb Garden
Indoor Growing
Landscaping Basics
Landscaping Patios
Landscaping Plants
Landscaping Shrubs
Landscaping Trees
Landscaping Walks & Pathways
Lawn Basics
Lawn Maintenance
Lawn Mowers
Lawn Ornaments
Lawn Planting
Lawn Tools
Outdoor Growing
Overall Landscape Planning
Pests, Weeds & Problems
Plant Basics
Rock Garden
Rose Garden
Shrubs
Soil
Specialty Gardens
Trees
Vegetable Garden
Yard Maintenance
How to Build an Herb Garden Box
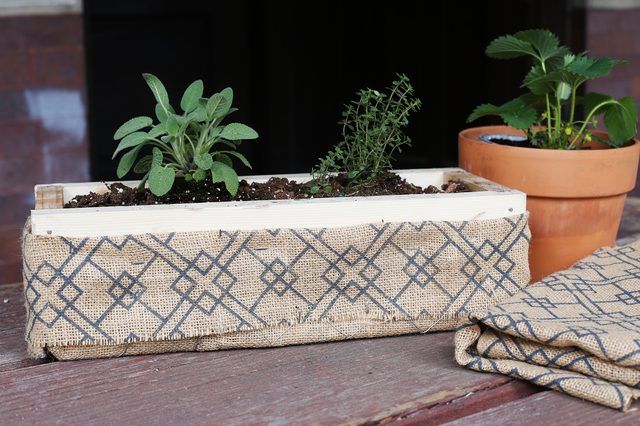
How to Build an Herb Garden Box. Fresh herbs will take your culinary creations to a new level, and building your own herb garden box will take only a few hours. Most common herbs, such as parsley (Petroselinum crispum), require well-drained soil. So giving your herb box a porous base is important. After you put plants in the herb box, set it in a...
Fresh herbs will take your culinary creations to a new level, and building your own herb garden box will take only a few hours. Most common herbs, such as parsley (Petroselinum crispum), require well-drained soil. So giving your herb box a porous base is important. After you put plants in the herb box, set it in a place where it will get at least six hours of direct sunlight per day.
Things You'll Need
Untreated pine or cedar lumber
Measuring tape
Safety goggles
Sawhorse
Saw
Hammer
Finishing nails
Scissors
Burlap fabric
Staple gun
Staple gun staples
Tin snips
Chicken wire
Newspaper or coffee filters
Step 1
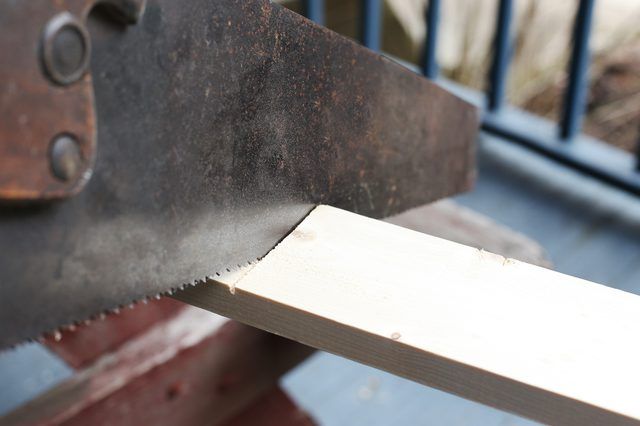
Determine the size for your herb box. Mark the measurements for the box's two sides and two ends on untreated pine or cedar lumber. Double-check the marks' measurements. The easiest way to build the box is to use lumber that is your desired height and width for the box so that only a few cuts have to be made.

Step 2
Place one plank of the lumber on a sawhorse, and support the lumber with your non-dominant hand. Saw through the lumber's marked lines, holding the saw with your dominant hand. Repeat the process for each piece of lumber you marked, cutting two side pieces and two end pieces for the box.
Step 3
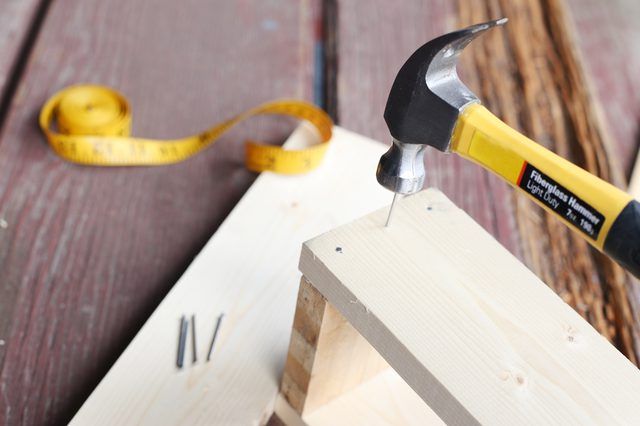
Align one of the box's end pieces with the inside of one of the box's side pieces. Hammer finishing nails through each end of the side piece so they go into the box's end piece. Repeat the process to attach the remaining pieces of cut wood to each other so they form a box.
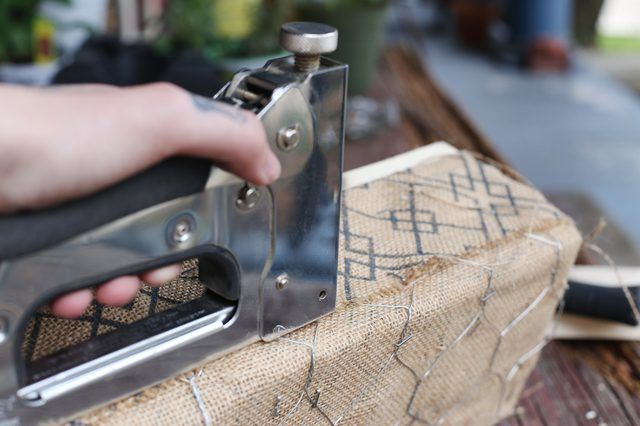
Step 4
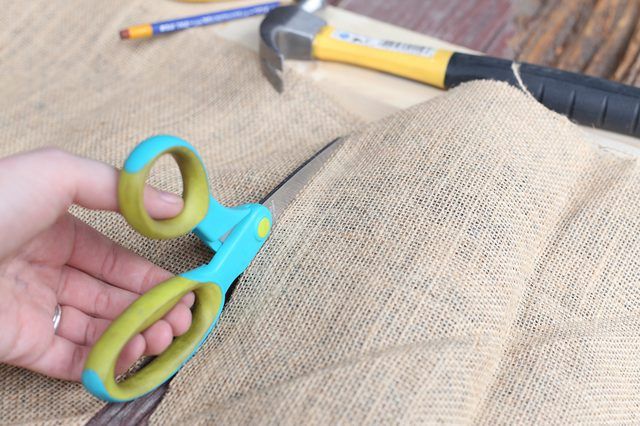
Cut burlap fabric to make a piece large enough to cover the box's bottom and overhang the box's side pieces by 3 inches. Attach the fabric securely to the bottom of the box by using a staple gun.
Step 5
Cut chicken wire to make a section large enough to cover the box's bottom and overhang the box's side pieces by 2 inches and be even with the box's end pieces. Staple the chicken wire to the bottom of the box, securing it on top of the burlap.
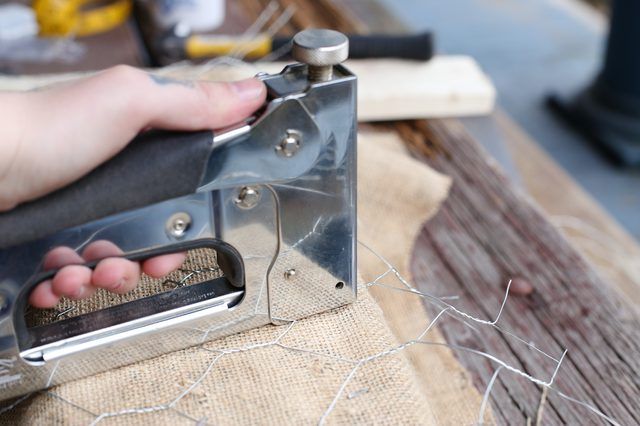
Step 6
Fold the burlap's overhang over the chicken wire, forming a hem in the burlap. Staple the hem to the sides of the box.
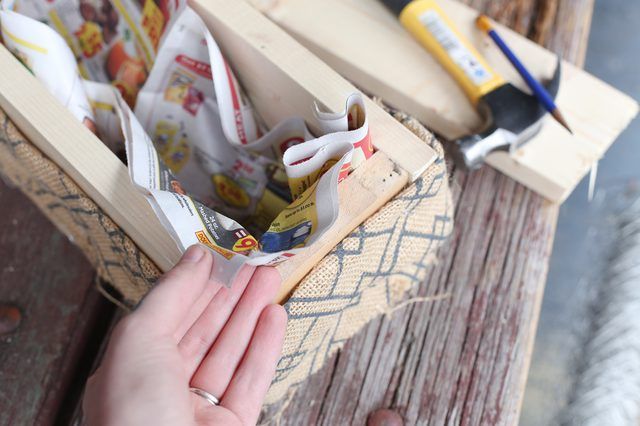
Step 7
Invert the herb box so that its bottom faces downward. If you wish to preserve the burlap for more than one season, line the bottom and interior of the box with newspaper or coffee filters. With or without the newspaper or coffee filters, the box is ready to be filled with a growing medium and herbs.


