Bulbs
Flower Basics
Flower Beds & Specialty Gardens
Flower Garden
Garden Furniture
Garden Gnomes
Garden Seeds
Garden Sheds
Garden Statues
Garden Tools & Supplies
Gardening Basics
Green & Organic
Groundcovers & Vines
Growing Annuals
Growing Basil
Growing Beans
Growing Berries
Growing Blueberries
Growing Cactus
Growing Corn
Growing Cotton
Growing Edibles
Growing Flowers
Growing Garlic
Growing Grapes
Growing Grass
Growing Herbs
Growing Jasmine
Growing Mint
Growing Mushrooms
Orchids
Growing Peanuts
Growing Perennials
Growing Plants
Growing Rosemary
Growing Roses
Growing Strawberries
Growing Sunflowers
Growing Thyme
Growing Tomatoes
Growing Tulips
Growing Vegetables
Herb Basics
Herb Garden
Indoor Growing
Landscaping Basics
Landscaping Patios
Landscaping Plants
Landscaping Shrubs
Landscaping Trees
Landscaping Walks & Pathways
Lawn Basics
Lawn Maintenance
Lawn Mowers
Lawn Ornaments
Lawn Planting
Lawn Tools
Outdoor Growing
Overall Landscape Planning
Pests, Weeds & Problems
Plant Basics
Rock Garden
Rose Garden
Shrubs
Soil
Specialty Gardens
Trees
Vegetable Garden
Yard Maintenance
How to Landscape a Slope With Rocks
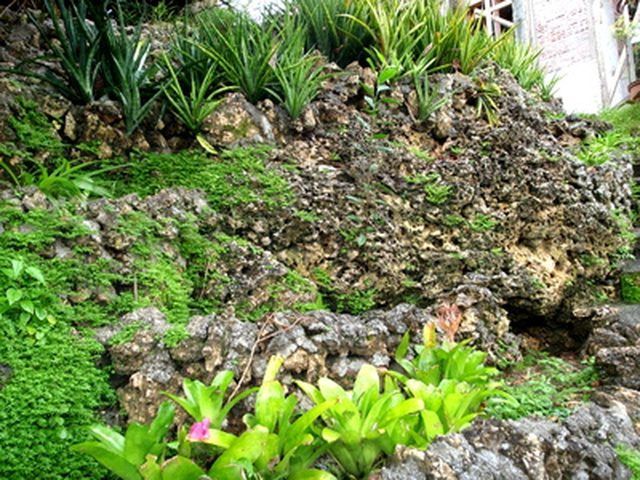
How to Landscape a Slope With Rocks. Rocky slopes challenge even experienced gardeners. Consider this potential roadblock an opportunity. Changes in terrain make natural focal points. Rocks on a slope can be used as terraces, plant nooks or cascade walls. Large anchor rocks can be placed at the base of the hill to tie in the slope with the rest of...

Rocky slopes challenge even experienced gardeners. Consider this potential roadblock an opportunity. Changes in terrain make natural focal points. Rocks on a slope can be used as terraces, plant nooks or cascade walls. Large anchor rocks can be placed at the base of the hill to tie in the slope with the rest of the garden. Many high-end garden landscape professionals actually build up flat land gardens in order to create variety and interest. Embrace the slope and enhance your garden and home.
Things You'll Need
Sturdy work boots
Gardening gloves
Long-handled garden spade
Short-handled hand trowel
Long-acting granular fertilizer
Plastic landscape flags
Perennial plants
Walk up your slope. Pull out any existing weeds from the root and dispose of them carefully, since any seeds discarded on the ground can sprout. Rake smooth the soil, removing or saving smaller rocks. Cut back any tree branches that might limit sun or air circulation
Make a rough sketch of the layout of your garden. Use a compass and write down the north-south-east-west exposure on your garden sketch. If your slope is north-facing, you'll choose different plants than if your slope has the full sun of a south-facing slope.
Note any existing drainage issues, including any pipes that may direct water onto the top of your hillside. Reroute these water sources. Eliminate any sources of erosion on your slope.
Sketch out the location of any very large rocks. Draw them as squares on your sketch to help you remember their location. Plan out where you want to plant each plant on the sketch. Use a different color pencil for each different plant type.
Mark plant locations indicated on your sketch, using plastic landscape flags. Push the metal wire support at least 3 inches into the soil. Dig out small terraces with a large spade. The terraces should be twice as wide as each plant. Repeat for each plant location.
Gently dig out holes to accommodate your plants in the middle of each terrace. Place the plants in the holes, add amendments to the soil if needed, and back-fill the holes with the displaced earth. Tamp the plants down with your fingers and palms.
Tips & Warnings
Prepare before you plant. Make sure the soil is not too wet; saturated soils will suffocate new plantings. Grab a handful of soil and squeeze it in your palm. If the dirt clumps together in a firm ball, wait a few days until the soil dries out a bit.
Try massing one type of planting. Trail rosemary in a cascade down a hillside and over a rock face. Plant seven plants, 3 feet from each other in a gentle curve down your slope. Fill in flowering perennials such as day lilies in clusters around each side of the rosemary.
Wear sturdy boots with non-slip soles.