Bulbs
Flower Basics
Flower Beds & Specialty Gardens
Flower Garden
Garden Furniture
Garden Gnomes
Garden Seeds
Garden Sheds
Garden Statues
Garden Tools & Supplies
Gardening Basics
Green & Organic
Groundcovers & Vines
Growing Annuals
Growing Basil
Growing Beans
Growing Berries
Growing Blueberries
Growing Cactus
Growing Corn
Growing Cotton
Growing Edibles
Growing Flowers
Growing Garlic
Growing Grapes
Growing Grass
Growing Herbs
Growing Jasmine
Growing Mint
Growing Mushrooms
Orchids
Growing Peanuts
Growing Perennials
Growing Plants
Growing Rosemary
Growing Roses
Growing Strawberries
Growing Sunflowers
Growing Thyme
Growing Tomatoes
Growing Tulips
Growing Vegetables
Herb Basics
Herb Garden
Indoor Growing
Landscaping Basics
Landscaping Patios
Landscaping Plants
Landscaping Shrubs
Landscaping Trees
Landscaping Walks & Pathways
Lawn Basics
Lawn Maintenance
Lawn Mowers
Lawn Ornaments
Lawn Planting
Lawn Tools
Outdoor Growing
Overall Landscape Planning
Pests, Weeds & Problems
Plant Basics
Rock Garden
Rose Garden
Shrubs
Soil
Specialty Gardens
Trees
Vegetable Garden
Yard Maintenance
How to Sod St. Augustine Grass
How to Sod St. Augustine Grass. A warm-season grass, St. Augustine grass (Stenotaphrum Secundatum) turns green from spring through autumn and then goes dormant, losing its color in winter. It will grow in U.S. Department of Agriculture plant hardiness zones 7a through 11. Lay St. Augustine sod in spring or early summer so it can develop its roots...
A warm-season grass, St. Augustine grass (Stenotaphrum Secundatum) turns green from spring through autumn and then goes dormant, losing its color in winter. It will grow in U.S. Department of Agriculture plant hardiness zones 7a through 11. Lay St. Augustine sod in spring or early summer so it can develop its roots before cold autumn weather.
Soil Prep
St. Augustine grass grows best in a pH range of 5 to 8.5. You may want to have your soil tested for nutrient deficiencies. To do this, collect samples from the top 4 to 6 inches of soil in 10 or more locations in the area you want to sod. You can have the samples examined at a soil testing service, and some agricultural extension offices will do it for you. You may need to add fertilizer or lime to raise the soil pH.
If your topsoil has low fertility, work 1 to 3 cubic yards of composted chicken litter, composted rice hulls, decomposed manure or peat into the top 6 to 8 inches of 1,000 square feet of area. Adding new, fertile topsoil requires 19 cubic yards for a 6-inch layer over 1,000 square feet.
Clear the site of rocks, wood and scrap and make sure that it drops 1 foot for every 50 feet to carry water away from the foundation of a house. If there are perennial weeds on the location, spray the soil with 2 2/3 ounces of 41 percent of glyphosate, a contact herbicide, per gallon of water.
Grading and Sod Delivery
After you have amended the soil, let it settle for a week before the final grading. Use a hand rake to grade small areas. Pull a plank or heavy metal bar across the soil to level it and smooth out the bumps. Sidewalks and driveways should be about 1/2 inch above the surface. There should be no low spots to collect water after the sod is laid. If your footprints sink more than 1/2 inch deep, press the soil with a lawn roller. Many garden supply centers rent lawn rollers.
Make sure the sod is moist and delivered within one day of harvest. It should be protected from the wind and sun during delivery. Sod pieces are typically 18 inches wide and 24 inches long. A square yard will weigh from 35 to 40 pounds.
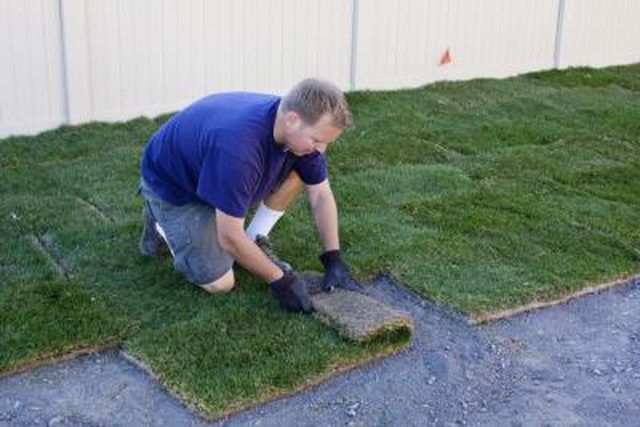
Laying the Sod
Water the soil when the sod arrives. Lay it quickly, beginning with a strip along the edge of a sidewalk or driveway. Stagger the seams of subsequent strips so they look like the mortar lines between bricks. Fit the pieces tightly together so the roots won�t dry out, but they should not overlap. Avoid using strips less than 18 inches long or 9 inches wide, and do not walk on the strips as you lay them. Working on a piece of plywood will help prevent your knees from denting the sod.
Pause occasionally to water large areas of sod to keep them from drying out. If you have to interrupt your work, mound soil around exposed edges to prevent the roots from drying out.
If your lawn only has curves, lay the strips at right angles to the curve. Cut the sod with a sharp knife or edge of a trowel so it will fit against curves and around sprinkler heads. A trowel will help you fill in and smooth out small depressions.
Start at the bottom of slopes, pinning the high end of each piece with two wooden pegs. Pause occasionally to water large areas of sod to keep them from drying out.
Rolling and Watering
When you�re finished, use a lawn roller to press the sod down to give the roots good contact with the soil. Water it again thoroughly. Water the sod five to six times a day for the first three to four days. As the roots get established, water less frequently for longer periods. Do not let the grass get so dry that its blades curl. Do not mow until the grass is rooted, about 10 to 14 days after you lay the sod. Keep people off the grass for three to four weeks.
Fertilizer and Fungicide
Apply and water in 1 pound of nitrogen per 1,000 square feet four weeks after you lay the sod. The first number on a fertilizer package is the amount of nitrogen by weight. If the first number is 20, it would take 5 pounds of that fertilizer to add 1 pound of fertilizer.
St. Augustine grass is especially susceptible to fungal root rots in areas with hot, humid summers. Spray twice at 28-day intervals in spring or fall with a fungicide containing the active ingredient azoxystrobin at the rate of 2/5 ounce per 1,000 feet of sod. Do not apply following rain, and after you spray it, soak it in with 1/2 to 1 inch of water.


