Bulbs
Flower Basics
Flower Beds & Specialty Gardens
Flower Garden
Garden Furniture
Garden Gnomes
Garden Seeds
Garden Sheds
Garden Statues
Garden Tools & Supplies
Gardening Basics
Green & Organic
Groundcovers & Vines
Growing Annuals
Growing Basil
Growing Beans
Growing Berries
Growing Blueberries
Growing Cactus
Growing Corn
Growing Cotton
Growing Edibles
Growing Flowers
Growing Garlic
Growing Grapes
Growing Grass
Growing Herbs
Growing Jasmine
Growing Mint
Growing Mushrooms
Orchids
Growing Peanuts
Growing Perennials
Growing Plants
Growing Rosemary
Growing Roses
Growing Strawberries
Growing Sunflowers
Growing Thyme
Growing Tomatoes
Growing Tulips
Growing Vegetables
Herb Basics
Herb Garden
Indoor Growing
Landscaping Basics
Landscaping Patios
Landscaping Plants
Landscaping Shrubs
Landscaping Trees
Landscaping Walks & Pathways
Lawn Basics
Lawn Maintenance
Lawn Mowers
Lawn Ornaments
Lawn Planting
Lawn Tools
Outdoor Growing
Overall Landscape Planning
Pests, Weeds & Problems
Plant Basics
Rock Garden
Rose Garden
Shrubs
Soil
Specialty Gardens
Trees
Vegetable Garden
Yard Maintenance
Homemade Boulders
Homemade Boulders. Natural stones and boulders add a rustic, natural appearance to cultivated landscaping projects. Unfortunately, natural stone can be heavy and expensive. A small boulder measuring 24 inches by 36 inches by 12 inches can weigh as much as 1,000 pounds. As of 2010, a natural boulder of this size can cost several hundred dollars. A...
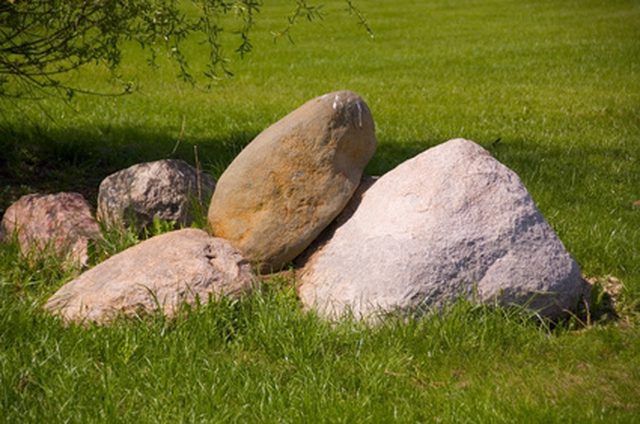
Natural stones and boulders add a rustic, natural appearance to cultivated landscaping projects. Unfortunately, natural stone can be heavy and expensive. A small boulder measuring 24 inches by 36 inches by 12 inches can weigh as much as 1,000 pounds. As of 2010, a natural boulder of this size can cost several hundred dollars. A more cost-effective solution is to craft your own ornamental rocks and boulders. Most methods for making realistic-looking rock are cement-based. Making homemade boulders is not an exact science, but it can be a rewarding undertaking for those who are not opposed to an occasional creative challenge.
Things You'll Need
Petroleum jelly
Rock or boulder-shaped mold (size of your choice)
Protective clothing (long sleeves, pants and plastic apron)
Small particle dust mask
Eye protection/goggles
Heavy-duty rubber gloves
Large wheelbarrow
1 part white Portland cement
1 1/2 parts dried peat moss
1 1/2 parts small to medium-sized perlite
Powdered concrete pigment(s) (optional)
Shovel
Water hose
Plastic sheeting
Trowel
Large, black plastic bag
Waterproof/lightweight rubber gloves
Large sponge or sculpting tools (optional)
Concrete sealant (optional)
Cover the inside of a mold with petroleum jelly. This will allow the finished form to be easily removed later. Put on protective clothes, a dust mask, gloves and protective eyewear. The materials that you will be using can be caustic to bare skin, dust particles are respiratory irritants, and loose fragments can burn your eyes.
Pour the Portland cement, peat moss and perlite into a large wheelbarrow. Use a shovel to thoroughly mix the ingredients together. If colored stone is desired, add 1 cup of concrete pigment to the dry mix and stir well to distribute the color evenly.
Wet the mixture gradually with a water hose, stopping periodically to stir the water in well. You will know that the correct amount of water has been added when a small handful can be molded in your fist and retain its shape without crumbling when you open your hand. The moistened mixture should be similar to moldable clay.
Spread plastic sheeting in a warm, ventilated space that is free from sudden drafts and wind. Use a trowel to spread the clay-like mixture into the prepared mold, filling it well. Wrap the mold in a plastic bag and secure it closed. This allows the material in the mold to cure very slowly, making a more durable product. Leave the mold in place four or five days.
Put on your protective gear and lightweight rubber gloves. Open the bag and check the mold. If the material in the mold can only be scratched away with difficulty, you may remove the rock boulder from the mold. Otherwise, rewrap the mold and wait three to five more days. Gently unmold the boulder, remembering that it is not yet finished curing and is still easily damaged. Now you may opt to press or pat over the surface with a moist sponge or lightly carve the exterior with sculpting tools to add texture and realistic shape.
Cover the boulder again in the plastic bag and keep it sealed and undisturbed for up to one month in a sunny, warm area. A long, slow drying time will yield a stronger boulder. If you live in a colder climate, this may take twice as long. When the resulting stone sounds hollow, you can remove the bag. Rinse the boulder with a water hose for five minutes once or twice a day for up to seven days to normalize its pH. The new stone will be very alkaline after it cures, and daily rinsing should help correct this. Allow the stone to dry completely. Cement sealant may be added now if you don't wish for your stone to look weathered over time, although some people find that a weathered stone looks more genuine.
Place the new boulder in its new location on your property. It should be relatively light compared to its size. Incorporate it into the landscape by placing plants around it or combining it with other garden features, such as fountains, ponds and walking paths.
Tips & Warnings
Remember that any dry pigments added during the mixing process will look one to three shades lighter than what you may have intended, but will darken when moistened. When water is added and the mixture well-blended, you will be able to tell whether any additional coloring is needed.


