Bulbs
Flower Basics
Flower Beds & Specialty Gardens
Flower Garden
Garden Furniture
Garden Gnomes
Garden Seeds
Garden Sheds
Garden Statues
Garden Tools & Supplies
Gardening Basics
Green & Organic
Groundcovers & Vines
Growing Annuals
Growing Basil
Growing Beans
Growing Berries
Growing Blueberries
Growing Cactus
Growing Corn
Growing Cotton
Growing Edibles
Growing Flowers
Growing Garlic
Growing Grapes
Growing Grass
Growing Herbs
Growing Jasmine
Growing Mint
Growing Mushrooms
Orchids
Growing Peanuts
Growing Perennials
Growing Plants
Growing Rosemary
Growing Roses
Growing Strawberries
Growing Sunflowers
Growing Thyme
Growing Tomatoes
Growing Tulips
Growing Vegetables
Herb Basics
Herb Garden
Indoor Growing
Landscaping Basics
Landscaping Patios
Landscaping Plants
Landscaping Shrubs
Landscaping Trees
Landscaping Walks & Pathways
Lawn Basics
Lawn Maintenance
Lawn Mowers
Lawn Ornaments
Lawn Planting
Lawn Tools
Outdoor Growing
Overall Landscape Planning
Pests, Weeds & Problems
Plant Basics
Rock Garden
Rose Garden
Shrubs
Soil
Specialty Gardens
Trees
Vegetable Garden
Yard Maintenance
How to Plant Hydrangeas in Pots
How to Plant Hydrangeas in Pots. Fill patio planters and pots with hydrangeas (*Hydrangea spp.*) in spring for a summer full of flowers. Hydrangeas grow in U.S. Department of Agriculture plant hardiness zones 3 through 9 depending on the species, and they range in size from 3 to 9 feet tall. Two varieties that grow well in containers are big leaf...
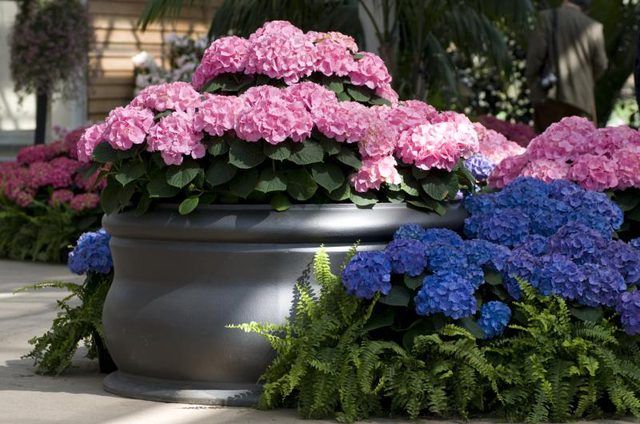
Fill patio planters and pots with hydrangeas (Hydrangea spp.) in spring for a summer full of flowers. Hydrangeas grow in U.S. Department of Agriculture plant hardiness zones 3 through 9 depending on the species, and they range in size from 3 to 9 feet tall. Two varieties that grow well in containers are big leaf hydrangea (Hydrangea macrophylla), hardy in USDA zones 5 through 9, and mountain hydrangea (Hydrangea serrata), hardy in USDA zones 6 through 9. While spring is the best time to plant, you can pot up hydrangeas anytime through summer.
The Right Planter
When selecting a planter for hydrangeas, consider both aesthetics and functionality. You can choose the material of the planter based on aesthetics, such as wood, colored plastic, terracotta or glazed ceramic, but it must have drainage holes. Terracotta and wood dry out more rapidly, so if watering is an issue in your area, consider plastic or glazed ceramic. Some new pots come with a plug in the bottom covering the drainage hole. Make sure to pop it out before planting hydrangeas.
Look for a planter or pot 2 to 4 inches bigger in diameter than the nursery pot or planter the hydrangea is in.
Disinfecting Pots and Planters
Clean and disinfect both new and old planters before planting.
Dump out old dirt and give the pot a scrub with detergent and water to remove any soil particles.
Fill a bucket or trough -- make sure its large enough to submerge the planter -- with a 9-to-1 water-to-bleach solution.
Soak the old planters for 10 to 15 minutes.
Remove the planter and wash it with soapy water, then rinse.
Allow the pot to air-dry before potting up your new hydrangeas.
Large planters are difficult to soak because it's not always easy to find something large enough for full submersion. An alternative method is to seal the drain holes temporarily -- try duct tape -- then fill the container up to the top with the bleach solution. Allow it to sit in the pot for 10 minutes, then drain, remove the tape, wash, rinse and allow to dry.
Acidic Potting Blend
Hydrangeas like acidic potting soil. Use peat moss to increase the acidity of regular potting soil. Use equal parts of each, and blend them thoroughly before planting. If the peat moss is dry, soak it in a bucket of water overnight, then drain out the excess water before mixing it with potting soil.
Scoop two to three handfuls of potting medium into the bottom of the container to form a base for the root ball.
Potting Up
Gently wiggle the hydrangea out of the nursery pot, handling it by the roots, and set it on top of the peat moss and potting soil blend. Add or take out material from the bottom of the pot until the top of the root ball is 3 inches below the edge of the pot. Fill in around the roots with additional damp peat moss, bringing the level up to the base of the stalks.
Place potted hydrangeas in full morning sun with light afternoon shade. For an indoor plant, set it in a room with bright morning light but no direct afternoon sun.
Water and Fertilizer
Water potted hydrangeas immediately after planting, then each time the potting mix starts to dry out 1 inch deep. Soak the potting mix until a little extra leaks out the drainage hole in the bottom. That way you know the water penetrated through to the bottom.
Fertilize right after planting, then every two weeks, with a complete water-soluble fertilizer. Dilute 3/4 tablespoon in 1 1/2 gallons of water and use it, along with additional water if necessary, to water the potting soil of outdoor plants.
Repot in Spring
Repot hydrangeas in early spring before new growth starts using a blend of equal parts peat moss and potting soil. Gently tease the root ball out of the container and brush of excess dirt to expose the outer roots. Check for rot or mushy spots and pull apart roots that circle the root ball. Repot in the same planter, or go up a pot size if the root ball is crowded in the old planter.


