Bulbs
Flower Basics
Flower Beds & Specialty Gardens
Flower Garden
Garden Furniture
Garden Gnomes
Garden Seeds
Garden Sheds
Garden Statues
Garden Tools & Supplies
Gardening Basics
Green & Organic
Groundcovers & Vines
Growing Annuals
Growing Basil
Growing Beans
Growing Berries
Growing Blueberries
Growing Cactus
Growing Corn
Growing Cotton
Growing Edibles
Growing Flowers
Growing Garlic
Growing Grapes
Growing Grass
Growing Herbs
Growing Jasmine
Growing Mint
Growing Mushrooms
Orchids
Growing Peanuts
Growing Perennials
Growing Plants
Growing Rosemary
Growing Roses
Growing Strawberries
Growing Sunflowers
Growing Thyme
Growing Tomatoes
Growing Tulips
Growing Vegetables
Herb Basics
Herb Garden
Indoor Growing
Landscaping Basics
Landscaping Patios
Landscaping Plants
Landscaping Shrubs
Landscaping Trees
Landscaping Walks & Pathways
Lawn Basics
Lawn Maintenance
Lawn Mowers
Lawn Ornaments
Lawn Planting
Lawn Tools
Outdoor Growing
Overall Landscape Planning
Pests, Weeds & Problems
Plant Basics
Rock Garden
Rose Garden
Shrubs
Soil
Specialty Gardens
Trees
Vegetable Garden
Yard Maintenance
How to Divide Daylilies
How to Divide Daylilies. Give daylilies (Hemerocallis spp.) six to eight hours of sunshine, 1 inch of water per week and some 3-12-12 fertilizer after they bloom and they'll give you season after season of color. Actually, they'll bloom like crazy for **three to five years then decline** a bit -- then a bit more -- until you have an impressive...
Give daylilies (Hemerocallis spp.) six to eight hours of sunshine, 1 inch of water per week and some 3-12-12 fertilizer after they bloom and they'll give you season after season of color. Actually, they'll bloom like crazy for three to five years then decline a bit -- then a bit more -- until you have an impressive stand of grassy leaves and a few scattered blooms. Divide the plants periodically to keep them blooming well.
How Often to Divide
Species daylilies such as tawny daylily (Hemerocallis fulva), hardy in U.S. Department of Agriculture plant hardiness zones 3 through 9, and lemon daylily (Hemerocallis lilioasphodelus), hardy in USDA zones 4 through 10, are probably the ancestors of your hybrid daylilies. Both species are invasive in some U.S. locations, multiplying quickly when not contained. Tawny and lemon daylilies bloomed in American Colonial cottage gardens and sunny farmyards, and they spread across the continent. Today's hybrid daylilies, whether early or modern, typically spread less aggressively. When your hybrid daylilies' blooming begins to decline, whether after three or seven years, divide and propagate them.
When to Start
Daylilies are herbaceous perennials that spread by thick roots called rhizomes. Unlike bulb plants that grow tidy new bulbs around their parents, daylilies have crowns and roots that must be untangled when the plants are divided into sections. Because each division, or section, has a mature crown -- the white base that connects fans of leaves and roots -- the resilient daylily survives division in spring or fall. If you're willing to water the divisions daily and pitch them a tent for shade, then you might be successful dividing daylilies in summer, too. The best time to divide your plants to produce root growth and guarantee next summer's flowers, though, is from late August through September, after the heat of summer passes.
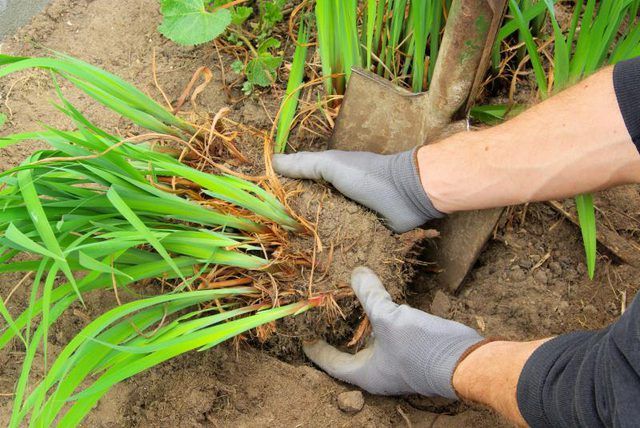
How to Dig Them Up
Dig up a daylily clump by lifting it with a garden fork to avoid cutting a lot of the plant's roots. Insert a shovel all around the clump, and then work the shovel round the clump again, lifting the plant as you proceed. Strong daylily roots can reach downward 12 to 18 inches so be hard to remove, but eventually the plant clump will release from the soil. Pull up the clump, and knock as much of its soil back into the ground as possible. Then locate the crowns. Trim fans of leaves to about 3 inches tall if you dug up the plant in fall. You can either pull crowns apart by hand or with two garden forks, roll the plant until the crowns separate or cut crowns apart with a sharp knife. Separate each crown into smaller crowns of at least 3 to 5 fans. Clean your tools before beginning and between plants by wiping them with a mixture that is one-half rubbing alcohol and one-half water.
How to Plant Them
Dig planting holes about one and one-half the size of the divided crowns, and mix a few handfuls of peat moss or well-rotted compost with the removed soil to encourage root growth. Use that soil mixture to build a little mound in the bottom of each planting hole, and trim broken and ungainly roots before planting each crown on its soil mound. Spread the roots around each mound, and fill the remainder of each hole with soil, holding each crown no more than 1 inch below the surrounding soil surface. Water the planting site deeply, and keep the soil moist until the plants' top growth begins again.


