Bulbs
Flower Basics
Flower Beds & Specialty Gardens
Flower Garden
Garden Furniture
Garden Gnomes
Garden Seeds
Garden Sheds
Garden Statues
Garden Tools & Supplies
Gardening Basics
Green & Organic
Groundcovers & Vines
Growing Annuals
Growing Basil
Growing Beans
Growing Berries
Growing Blueberries
Growing Cactus
Growing Corn
Growing Cotton
Growing Edibles
Growing Flowers
Growing Garlic
Growing Grapes
Growing Grass
Growing Herbs
Growing Jasmine
Growing Mint
Growing Mushrooms
Orchids
Growing Peanuts
Growing Perennials
Growing Plants
Growing Rosemary
Growing Roses
Growing Strawberries
Growing Sunflowers
Growing Thyme
Growing Tomatoes
Growing Tulips
Growing Vegetables
Herb Basics
Herb Garden
Indoor Growing
Landscaping Basics
Landscaping Patios
Landscaping Plants
Landscaping Shrubs
Landscaping Trees
Landscaping Walks & Pathways
Lawn Basics
Lawn Maintenance
Lawn Mowers
Lawn Ornaments
Lawn Planting
Lawn Tools
Outdoor Growing
Overall Landscape Planning
Pests, Weeds & Problems
Plant Basics
Rock Garden
Rose Garden
Shrubs
Soil
Specialty Gardens
Trees
Vegetable Garden
Yard Maintenance
How to Make a Stepping Stone Pathway With a Mold
How to Make a Stepping Stone Pathway With a Mold. Stepping stone walk or patio area is easy to do, by following these easy instructions.
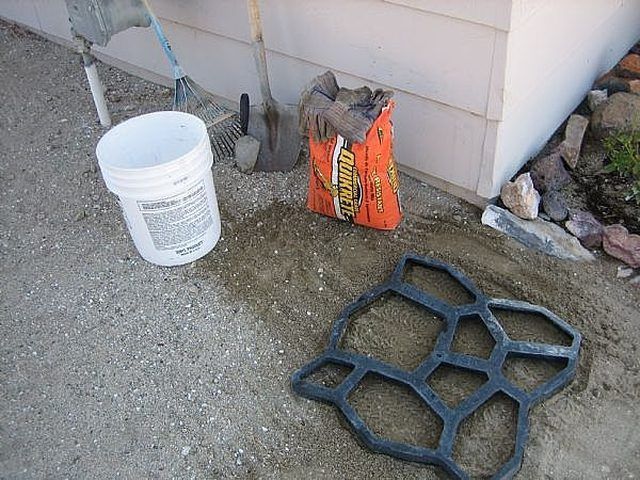
Stepping stone walk or patio area is easy to do, by following these easy instructions.
Things You'll Need
Walkmaker or any other kind of mold for the stones.
Shovel to mix cement
Quick set cement (QuikCrete is good)
Dye if you want color
A large pan to mix in or bucket if smaller amount
Water hose and water
Area to make path or patio
Or a place to make the steps if you want to take them up and use them later somewhere else.
Some play sand for a texture to stone, or item you might want to press into the wet cement like a leaf or hand print.
Gather all the materials together. A bag of cement will weigh about 60 to 80 lbs so be sure to have some help with the lifting. It will take about 1 and a half bags to make 2 stones depending on mold size.
Leveling out a grassy area is not to hard just remove the grass down to the soil, level the ground nicely and place your step mold in that area. You can always add more grass later or fill in with added cement or sand between the step spaces.
Draw out your plan on paper. Sometimes working from scratch ends up a little "Iffy". Nice thing is the stones when set are so easy to remove.
NOW YOU ARE READY TO MIX!!! Don't breathe in the dust of the cement when pouring it into the pan. If you want colored steps then use liquid cement colorant to water before mixing. Instructions on bottle.
Mix to a good mud pie mix, stirring very well with a large trowel or shovel if doing a lot. The bags tell you how to go about it.
The molds should be in place from step 1, and ready to fill. Use one mold and move it to the next spot. They are pricy to buy if using large ones. So repeated use of one will take a while, but save money.
Fill the mold with the mixture and smooth off the top with a trowel. Lift the mold "IMMEDIATELY" after pouring, CAREFULLY OF COURSE. Rinse trowel and mold before using again. Then lay it on the next area, even overlapping if you want to turn a corner etc. Smooth out the area that the edges of the mold cut after removing the mold with this pour. After a few of these it gets easier. Mistakes can always be used else where for garden bricks.
The edges of the stones must be troweled as soon as the mold is lifted to make a smooth edge on each stone. While the stones are still wet sand can be sifted onto them for a natural look, or the impression of the leaf etc. The excess sand swept off later that is not stuck to the stones.
If you want to fill the space between the stones, a sand mix with grout is available. This can be sprinkled in dry and then lightly wet from the top with a spray nozzel of the hose. Or cement can be used with small pebbles to add texture, or let grass re-grow in the spaces.
This is the general rules for making stones. There are lots of variety of molds available. Or just make your own mold out of anything that will allow pouring cement inside and then lift off. There are solid molds also to make round stones or bricks etc. Be sure to read the directions with the mold you purchase.
ENJOY MAKING YOUR STEPS AND SURPRISE YOUR FAMILY AND FRIENDS WITH YOUR EXPERTISE.
The step will be ready to unmold as soon as the troweling is completed. Then trowel the edges to smooth the ridges created by the molding process. A long flat trowel is good for a large stepping stone. Use a small hand trowel for the edges.
Tips & Warnings
Make sure the ground is even so the stone will be uniform in depth.
Don't have air space at the lower edge the cement can run out of on the bottom edge of the mold.
Play around with different finishes and styles to get what you like best. Drying cement looks a lot different from wet.
Clean all molds and tools throughly, and don't rinse cement near any place you don't want a thin amount that could solidify.
Use contractor cement with added pebbles to areas between the stones. A quick texture change.
When pouring cement or grout between the stones keep as much as possible off the top of the stones. It can be brushed off with a wet paint brush before it drys.
Make sure not to breathe the grout or cement. A little mask will do fine, this step is fairly quick to do.
Have everything ready to use and reach before starting. Cement sets pretty fast. Be ready to work at a good pace, but it doesn't have to be a frantic pace.
Get any helpers the same protection you have for hand, and face mask, etc.


