Bulbs
Flower Basics
Flower Beds & Specialty Gardens
Flower Garden
Garden Furniture
Garden Gnomes
Garden Seeds
Garden Sheds
Garden Statues
Garden Tools & Supplies
Gardening Basics
Green & Organic
Groundcovers & Vines
Growing Annuals
Growing Basil
Growing Beans
Growing Berries
Growing Blueberries
Growing Cactus
Growing Corn
Growing Cotton
Growing Edibles
Growing Flowers
Growing Garlic
Growing Grapes
Growing Grass
Growing Herbs
Growing Jasmine
Growing Mint
Growing Mushrooms
Orchids
Growing Peanuts
Growing Perennials
Growing Plants
Growing Rosemary
Growing Roses
Growing Strawberries
Growing Sunflowers
Growing Thyme
Growing Tomatoes
Growing Tulips
Growing Vegetables
Herb Basics
Herb Garden
Indoor Growing
Landscaping Basics
Landscaping Patios
Landscaping Plants
Landscaping Shrubs
Landscaping Trees
Landscaping Walks & Pathways
Lawn Basics
Lawn Maintenance
Lawn Mowers
Lawn Ornaments
Lawn Planting
Lawn Tools
Outdoor Growing
Overall Landscape Planning
Pests, Weeds & Problems
Plant Basics
Rock Garden
Rose Garden
Shrubs
Soil
Specialty Gardens
Trees
Vegetable Garden
Yard Maintenance
How to Build a Bird Bath
How to Build a Bird Bath. A birdbath is a wonderful addition to any lawn or garden. Not only does it add a cheerful touch, but it will attract the local birds so you can enjoy watching them splash and play. For bird watchers, this is a great way to really get a glimpse of the wildlife. Learn how to build your own beautiful birdbath out of clay...
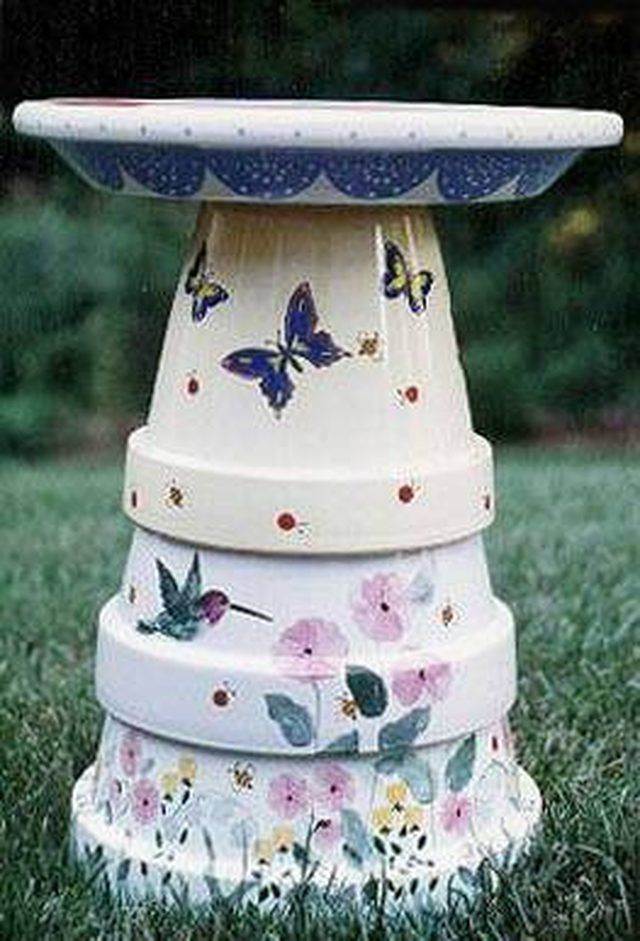
A birdbath is a wonderful addition to any lawn or garden. Not only does it add a cheerful touch, but it will attract the local birds so you can enjoy watching them splash and play. For bird watchers, this is a great way to really get a glimpse of the wildlife. Learn how to build your own beautiful birdbath out of clay pots.
Things You'll Need
16" terra cotta flower pot
14" terra cotta flower pot
12" terra cotta flower pot
20" clay saucer
Sandpaper
Oil-based polyurethane
Patio paints
Water-based polyurethane
Liquid Nails construction adhesive
Buy three terra cotta flower pots sizes 16", 14" and 12" as well as a 20" clay saucer with no hole in the bottom. Buy a water-proof saucer if possible. Sand the outsides and edges of the flower pots, and the bottom of the saucer to remove any loose particles or rough spots.
Stack the pots upside down on top of each other from largest to smallest. Draw a light line in pencil around where the rim of each pot ends so that you'll know what areas to paint later on.
Coat the outsides of each pot with oil-based polyurethane. Use two to three coats for a good, thick coating. Coat the inside of your saucer if it's not waterproof. Allow them to dry completely. Set them out in the sun if possible for faster drying time.
Paint the pots with any color or decoration you choose. If you paint above your pencil lines, you won't be able to see the design because it will be covered by the flower pot above it. Use patio paint for best results, as it is meant to withstand harsh weather.
Allow the paint to dry completely and thoroughly coat each pot with three or more coats of water-based polyurethane. Check the package before you purchase it to make sure that it can go over painted surfaces.
Stack the pots upside down again, assembling your birdbath. Place them on a patio or stepping stone when you are done, not on the ground, to preserve them. Apply a construction adhesive, such as Liquid Nails, to the bottom of the small pot. Place the saucer on top of the smallest pot, in the center right-side up. Allow it to dry, and fill your birdbath with water.
Tips & Warnings
Try using stencils and stamps to create designs on your bird bath.
To clean the birdbath, take it apart and wash with a soft cloth, water and mild detergent.
Take the birdbath apart and store it during the harsh winter months.


