Bulbs
Flower Basics
Flower Beds & Specialty Gardens
Flower Garden
Garden Furniture
Garden Gnomes
Garden Seeds
Garden Sheds
Garden Statues
Garden Tools & Supplies
Gardening Basics
Green & Organic
Groundcovers & Vines
Growing Annuals
Growing Basil
Growing Beans
Growing Berries
Growing Blueberries
Growing Cactus
Growing Corn
Growing Cotton
Growing Edibles
Growing Flowers
Growing Garlic
Growing Grapes
Growing Grass
Growing Herbs
Growing Jasmine
Growing Mint
Growing Mushrooms
Orchids
Growing Peanuts
Growing Perennials
Growing Plants
Growing Rosemary
Growing Roses
Growing Strawberries
Growing Sunflowers
Growing Thyme
Growing Tomatoes
Growing Tulips
Growing Vegetables
Herb Basics
Herb Garden
Indoor Growing
Landscaping Basics
Landscaping Patios
Landscaping Plants
Landscaping Shrubs
Landscaping Trees
Landscaping Walks & Pathways
Lawn Basics
Lawn Maintenance
Lawn Mowers
Lawn Ornaments
Lawn Planting
Lawn Tools
Outdoor Growing
Overall Landscape Planning
Pests, Weeds & Problems
Plant Basics
Rock Garden
Rose Garden
Shrubs
Soil
Specialty Gardens
Trees
Vegetable Garden
Yard Maintenance
How to Install Brick Landscape Edging
How to Install Brick Landscape Edging. Brick landscape edging defines and separates features throughout a garden or yard, providing a visual barrier to deter foot traffic and helping draw the eye to garden focal points. Edging can be made with new bricks, salvaged bricks or brick pavers left over from another landscaping project. A gravel and sand...
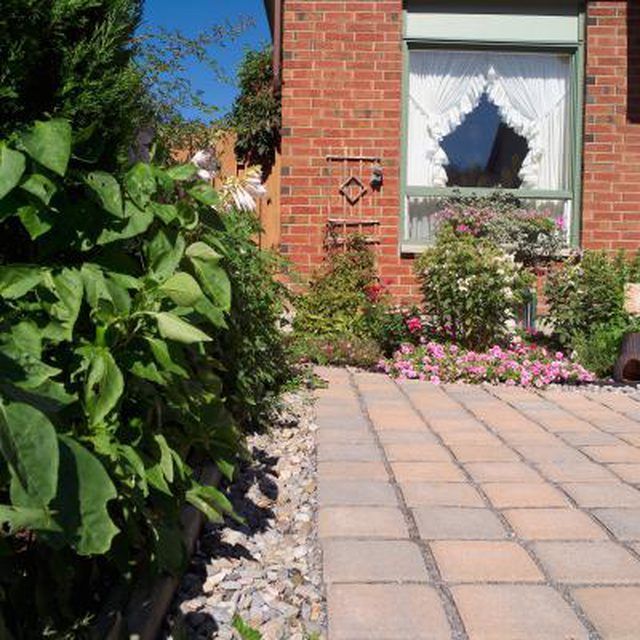
Brick landscape edging defines and separates features throughout a garden or yard, providing a visual barrier to deter foot traffic and helping draw the eye to garden focal points. Edging can be made with new bricks, salvaged bricks or brick pavers left over from another landscaping project. A gravel and sand base layer is not required under brick edging, but it stabilizes the ground enough to prevent bricks from sinking. Start with a base layer for the edging if you want visually perfect edging, particularly if the site has clay soil with poor drainage that leads to sunken bricks.
Things You'll Need
Wooden stakes, rope or garden hoses
Rubber mallet
Mason's string line (optional)
Landscaping spray paint
Measuring tape
Digging spade, border spade or other hand-operated edging tool
Hand tamper or scrap lumber board
Carpenter's level
3/4-minus gravel or crushed rock
Coarse sand
Edging restraints (optional)
12-inch-long landscaping spikes (optional)
Lay out the area where you want to install brick edging, using wooden stakes if the edging will be installed in a straight line or using rope or garden hoses if the edging will be installed in a curve. Drive wooden stakes in the ground at each end of the area where you want brick edging in a straight line. Tie a mason's string line tightly to the stakes so the line runs above ground from stake to stake. Alternatively, lay rope or garden hoses to mark where you want brick edging in a curve. Spray landscaping spray paint along the string line or directly beside the rope or hoses.
Measure one brick to determine the edging trench's width, which depends on the direction you wish to lay the bricks. Measure the brick's length if you want the bricks to run lengthwise from the inside of the edging area to its outside, with the long sides of the bricks against each other. A typical brick is about 8 inches long. Measure the brick's width if you want the bricks in the edging to have their short ends against each other. A typical brick is about 4 inches wide. Bricks also can be laid diagonally widthwise or lengthwise to accommodate a curved border. Add about 4 inches to the brick's length, width or measurement for diagonal placement, and spray a paint line at that distance outward from the first spray paint line. The extra 4 inches to the brick measurement is for working space. The resulting two painted lines mark the width for the edging trench.
Measure the brick's height to calculate the depth needed for the trench. A standard brick is 2 1/4 inches tall. Decide how much of the brick height you want to be visible above the soil surface. Bricks installed so their tops are even with the soil surface will work best if you want to mow directly over the edging. Plan to bury no more than one-half of the brick height in the edging trench if you want the edging to keep grass and weeds from crossing into a garden. The edging trench must be a minimum of 2 1/4 inches deep if you want the bricks' tops even with the soil surface. Add 4 inches to that trench depth if you want the trench to have a gravel and sand base layer, making a total minimum trench depth of 6 1/4 inches.
Dig a trench for the brick edging, using the painted lines as a guide. A digging spade, border spade or other hand-operated edging tool works best for cutting trenches with perfectly straight walls. Dig the trench to the depth determined by your calculations, including extra depth to add a base layer if one is desired.
Pack the soil in the trench, making it perfectly level. A hand tamper is commonly used for tamping soil, but the end of a scrap lumber board works well, too. Lay a carpenter's level in the trench's bottom, and check the bottom for levelness. Add or remove soil where needed to make the bottom level.
Spread a 3-inch-thick layer of 3/4-minus gravel or crushed rock on the trench's bottom if you want to include that layer. Make the layer, level and pack it with the tamper or board. Spread a 1-inch-thick layer of coarse sand over the gravel or rock layer if you want to include a sand layer. The sand will cushion the bricks and can correct imperfections in the gravel or rock layer's levelness. Lay the carpenter's level on top of the sand at various points along the trench, and add or remove sand where needed to make the sand perfectly level.
Set the bricks in the desired pattern -- long sides or short sides touching -- in the trench. Tap each brick with a rubber mallet to embed it in the trench. Check each brick for levelness, and adjust the material below the brick as needed to make the brick level. If you opt to lay the bricks diagonally, such as for a curve, lay the first brick so it leans backward and rests on one end of the trench, and lay the remaining bricks so each one leans backward to rest on the previous brick. Abut the bricks against the the flowerbed, patio or other feature the edging defines, leaving the trench's extra 4 inches of working room on the trench's other side.
Add edging restraints along the outside edge of the bricks if desired, preventing outward shifting of the bricks. For example, a patio or driveway prevents brick edging from shifting toward them, but the bricks can shift toward the lawn. Push the edging restraints tightly against the bricks' outside edges. Drive a 12-inch-long landscaping spike downward through each anchor hole in the edging restraints. The spikes anchor the restraints to the ground.
Fill the extra space in the trench with the soil you removed to create the trench. Pack the soil tightly against the bricks or edging restraints to prevent shifting.
Tips & Warnings
Some edging restraints have an L-shaped lip that goes under the bricks. If you use this type of edging restraint, set each restraint in place after leveling the sand but before laying the bricks.
Brick is typically a formal edging style, but reclaimed bricks that are aged, chipped or otherwise imperfect can work well in an informal setting such as a cottage garden. For this more relaxed setting, you might prefer the bricks to settle or shift, making the edging somewhat imperfect. If that is the case, then you could skip the base layer and edging restraints.
If you get to the end of the edging area and can't expand it enough to fit a full brick in that place, then cut the brick to size with a mallet and brick chisel. Mark the brick with a piece of chalk where you want to cut it. Line up the chisel's sharp end with the chalk mark, and tap the chisel's handle with the mallet to score, or indent, all sides of the brick. Set the scored brick on a flat work surface with the chisel's point positioned on one score line, and strike a hard blow on the chisel handle with the mallet to break the brick across all the scored lines.


