Bulbs
Flower Basics
Flower Beds & Specialty Gardens
Flower Garden
Garden Furniture
Garden Gnomes
Garden Seeds
Garden Sheds
Garden Statues
Garden Tools & Supplies
Gardening Basics
Green & Organic
Groundcovers & Vines
Growing Annuals
Growing Basil
Growing Beans
Growing Berries
Growing Blueberries
Growing Cactus
Growing Corn
Growing Cotton
Growing Edibles
Growing Flowers
Growing Garlic
Growing Grapes
Growing Grass
Growing Herbs
Growing Jasmine
Growing Mint
Growing Mushrooms
Orchids
Growing Peanuts
Growing Perennials
Growing Plants
Growing Rosemary
Growing Roses
Growing Strawberries
Growing Sunflowers
Growing Thyme
Growing Tomatoes
Growing Tulips
Growing Vegetables
Herb Basics
Herb Garden
Indoor Growing
Landscaping Basics
Landscaping Patios
Landscaping Plants
Landscaping Shrubs
Landscaping Trees
Landscaping Walks & Pathways
Lawn Basics
Lawn Maintenance
Lawn Mowers
Lawn Ornaments
Lawn Planting
Lawn Tools
Outdoor Growing
Overall Landscape Planning
Pests, Weeds & Problems
Plant Basics
Rock Garden
Rose Garden
Shrubs
Soil
Specialty Gardens
Trees
Vegetable Garden
Yard Maintenance
How to Start Vegetable Seeds Indoors
How to Start Vegetable Seeds Indoors. Starting vegetable seeds indoors gives you a jump on the growing season, expands your choices, and gives you the satisfaction of growing your own food from start to finish. With a few basics, even beginning gardeners can start seeds inside and succeed. Vegetable, flower and herb seeds all require the same...
Starting vegetable seeds indoors gives you a jump on the growing season, expands your choices, and gives you the satisfaction of growing your own food from start to finish. With a few basics, even beginning gardeners can start seeds inside and succeed. Vegetable, flower and herb seeds all require the same simple care.
Once you decide on seeds, you need a potting mix designed for seed starting and containers. Lighter and more porous than potting soil, sterile seed-starting mixes retain moisture well, but still allow air around developing roots. Don't use garden soil; it compacts easily and can carry plant diseases.
Start seeds in small individual pots or plastic packs like nurseries use. From cut-off milk cartons and peat pots to mini terra cotta pots, anything with drainage holes and a sturdy saucer works. You can even make pots from newspaper. Use containers deep enough for 1 to 2 inches of soil. Wash recycled containers in a solution of 1 part bleach to 9 parts water to disinfect them before using them.
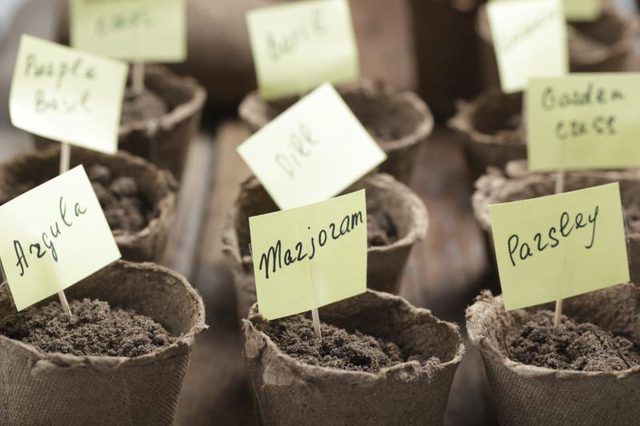
Even experienced gardeners mix up seedlings, so prepare to label everything. Use a waterproof marking pen and Popsicle-like sticks or toothpicks with sticky notes.
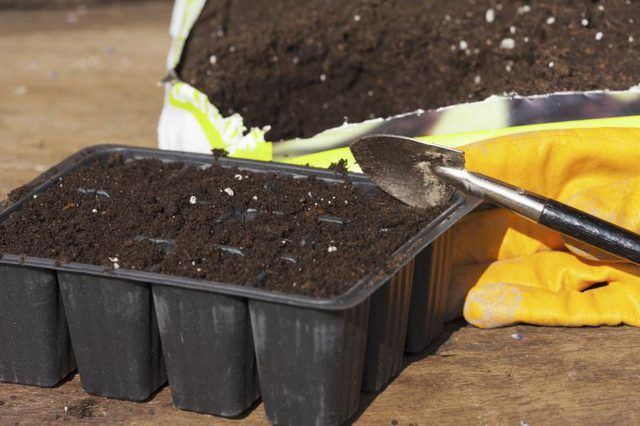
When sowing time arrives, moisten the starting mix thoroughly before you plant your seeds. It should be damp, but not dripping. If possible, do this the night before you plant. Fill each pot or planting cell with soil almost to the rim.
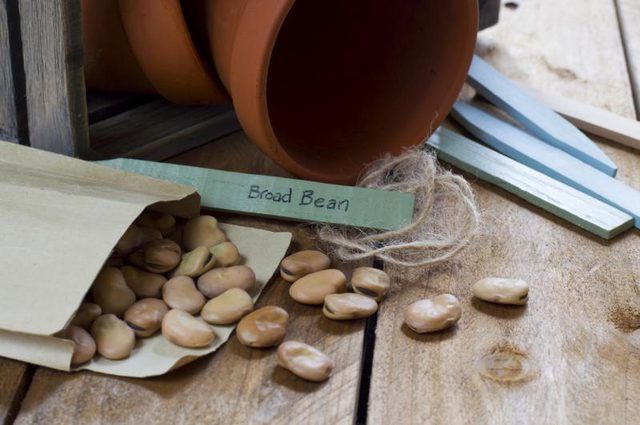
Most seeds are planted about three times as deep as their size. Small seeds stay near the surface, with some just firmly pressed into the soil. Follow your seed packet instructions for planting depth. Plant two to three seeds per cell -- it's normal for some not to grow. Spread them out, giving larger seeds more room, and label every pot. Tweezers help you place tiny seeds in the pot.
Many seeds don't need light until they begin to grow, but constant moisture and warmth are crucial. Stretch plastic wrap over containers or flats for a mini-greenhouse effect. Place newly planted seeds where temperatures stay between 70 and 85 degrees Fahrenheit. Warmth underneath helps, too: The top of a refrigerator or a similar place supplies bottom heat.
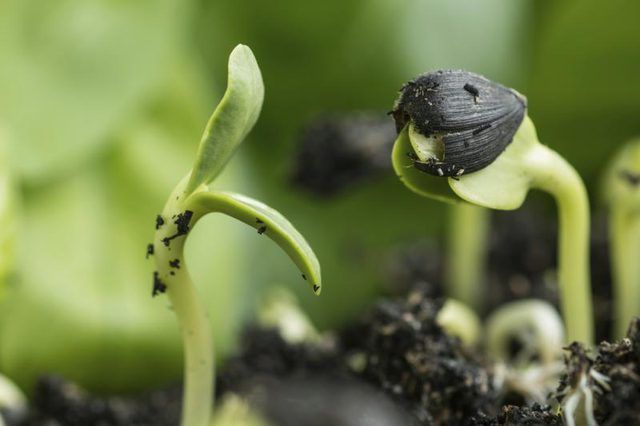
Watch your pots carefully for signs of life. Seeds vary in how fast they germinate. Lettuce can take just three to five days; marigolds (Tagetes spp.) take five to seven days; tomatoes may take seven to 10 days; and eggplants (Solanum melongena) can take up to two weeks.
Keep seeds constantly warm and moist until they begin to grow and sprout. Add water to the saucers, so it wicks up into pots, or water the surface gently so seeds stay put. Use room-temperature water, and let chlorinated water sit overnight before use.
Once sprouts appear, remove the plastic and move your growing seeds to a warm, brightly lit area. If your home lacks bright light, standard fluorescent lights placed 6 to 12 inches above seedlings provide light and warmth. Raise the lights as the seedlings grow.
New seedlings need nutrients. A gentle fertilizer, used at half strength once or twice per week, provides healthy nutrition. Natural fish-based fertilizers feed seedlings through soil and through leaves. Dissolve 1/2 tablespoon of dry 9-4-4 fish-based fertilizer in 1 gallon of water for a nutritious, half-strength solution.
As seedlings grow, thin out weak plants, and give stronger, healthier ones more room. Don't pull weaklings out; you'll disturb nearby roots. Snip them off at the soil line instead.
Rotate your seedlings regularly, so they don't bend in one direction toward windows or lights. Gradually reduce watering. Allow seedlings to dry just slightly between waterings, but never let them dry out completely.

Two weeks before you transplant to outdoor gardens or pots, start acclimating young plants to new conditions. Take them outside for a few hours of bright, indirect light each day. Gradually increase the time and light intensity, but limit direct sun or wind. Watch closely for signs of stress.
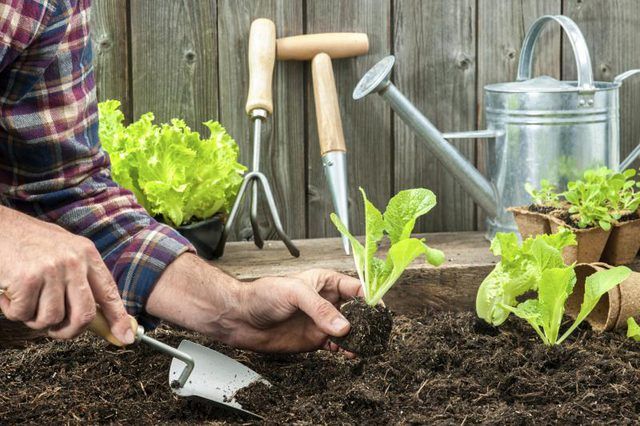
Transplant your new vegetables, flowers or herbs on a cloudy day or in late afternoon, so they settle in before hot sun hits. Carefully tip the container, and remove the transplant and its soil. Disturb roots as little as possible. Plant so the top of each transplant's soil is level with your garden soil. Gently firm surrounding soil by hand.
Watch over your new plants as they get established. Keep soil evenly moist, but never soggy. Before you know it, you'll be eating vegetables and herbs from your garden and enjoying your own seed-grown bouquets.


