Bulbs
Flower Basics
Flower Beds & Specialty Gardens
Flower Garden
Garden Furniture
Garden Gnomes
Garden Seeds
Garden Sheds
Garden Statues
Garden Tools & Supplies
Gardening Basics
Green & Organic
Groundcovers & Vines
Growing Annuals
Growing Basil
Growing Beans
Growing Berries
Growing Blueberries
Growing Cactus
Growing Corn
Growing Cotton
Growing Edibles
Growing Flowers
Growing Garlic
Growing Grapes
Growing Grass
Growing Herbs
Growing Jasmine
Growing Mint
Growing Mushrooms
Orchids
Growing Peanuts
Growing Perennials
Growing Plants
Growing Rosemary
Growing Roses
Growing Strawberries
Growing Sunflowers
Growing Thyme
Growing Tomatoes
Growing Tulips
Growing Vegetables
Herb Basics
Herb Garden
Indoor Growing
Landscaping Basics
Landscaping Patios
Landscaping Plants
Landscaping Shrubs
Landscaping Trees
Landscaping Walks & Pathways
Lawn Basics
Lawn Maintenance
Lawn Mowers
Lawn Ornaments
Lawn Planting
Lawn Tools
Outdoor Growing
Overall Landscape Planning
Pests, Weeds & Problems
Plant Basics
Rock Garden
Rose Garden
Shrubs
Soil
Specialty Gardens
Trees
Vegetable Garden
Yard Maintenance
Creating a Curved Garden Path
Use garden hoses to help plot the layout of a curved garden path. Keep the curves gentle and slight for a natural look.
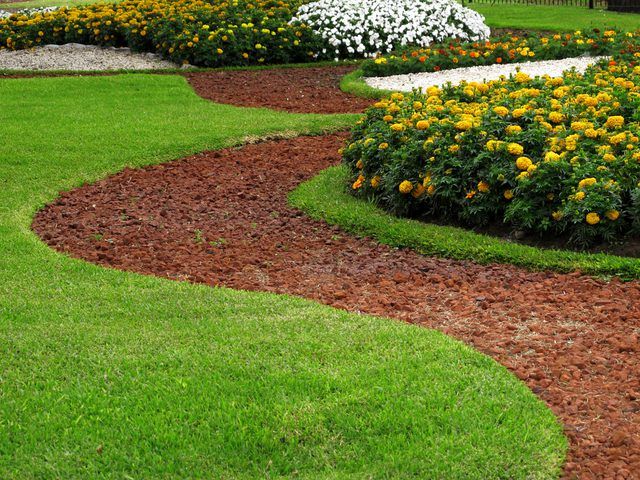
A curved path though the garden encourages meandering and taking your time as you walk through to admire the plants. It also looks a bit more natural in a garden that has no square edges. Plot the layout for a curved path using stakes, a tape measure and garden hoses.
Plotting the Path
Things You'll Need
Garden stakes or tent stakes
Hammer
Tape measure
Long garden hoses
Twine or marking chalk designed for grass
Step 1
Select starting and ending points for the path. Hammer a garden stake or tent stake along one corner of both the starting and finishing points.
Step 2
Measure the desired width of the path by placing one end of the tape measure along the starting stake, pulling the tape across to what will be the other side of the path and placing a garden stake at this location. If unsure how wide to make the path, select a minimum of 24 inches for a simple seldom-used walking path, if possible. If you plan to do some gardening from the path or want it to be a visual focal point for the space, 36 inches wide allows a narrow cart through. A 48-inch-wide path allows space for a garden cart or room for two people to walk side by side.
Step 3
Add a garden stake at the other side of the ending point of the path as well. For instance, if the left side of the path is already staked, insert a stake at the desired width on the right side using the same width chosen at the starting area of the path.
Step 4
Set one end of a garden hose at the left side of the stake indicating the beginning of the path, laying it along the ground in a curving shape to the left stake at the end of the path. Repeat the process with a second hose for the stakes along the right side of the path.
Tip
If the hoses aren't long enough to reach from one end of the path to the other, plot half the path at a time, marking the line with spray chalk, then moving the hoses to mark the second half of the path.
Step 5
Adjust the curvature of each hose to plot the curves of your garden path. The left and right sides should be mostly symmetrical if you desire a symmetrical path. The curves do not have to match perfectly.
Step 6
Move each hose slightly and spray a marking chalk designed for grass along the previous hose lines. If unable to find marking chalk, instead insert stakes every few feet along each hose line, then tie string from stake to stake to plot the basic path.
Making the Path
Dig out and level the area for the path 3 to 7 inches deep, depending upon the materials you plan to use along the path. A shallow path accommodates materials such as mulch, chipped bark or gravel, while a deeper path is necessary for bricks or stepping stones surrounded by pebbles. Fill the path with 2 inches of crushed gravel and another 2 inches or so of sand, tamped flat, before adding stepping stones or heavy materials. Set the stones atop the sand, then brush crushed gravel or sand between the materials. Skip the sand if making a bark or gravel pathway.
Tip
Garden edging may be used along the sides of the cut path before filling it in with the desired path materials. If weeds are an issue, install a weed barrier before adding filler to the cutout path.


