Bulbs
Flower Basics
Flower Beds & Specialty Gardens
Flower Garden
Garden Furniture
Garden Gnomes
Garden Seeds
Garden Sheds
Garden Statues
Garden Tools & Supplies
Gardening Basics
Green & Organic
Groundcovers & Vines
Growing Annuals
Growing Basil
Growing Beans
Growing Berries
Growing Blueberries
Growing Cactus
Growing Corn
Growing Cotton
Growing Edibles
Growing Flowers
Growing Garlic
Growing Grapes
Growing Grass
Growing Herbs
Growing Jasmine
Growing Mint
Growing Mushrooms
Orchids
Growing Peanuts
Growing Perennials
Growing Plants
Growing Rosemary
Growing Roses
Growing Strawberries
Growing Sunflowers
Growing Thyme
Growing Tomatoes
Growing Tulips
Growing Vegetables
Herb Basics
Herb Garden
Indoor Growing
Landscaping Basics
Landscaping Patios
Landscaping Plants
Landscaping Shrubs
Landscaping Trees
Landscaping Walks & Pathways
Lawn Basics
Lawn Maintenance
Lawn Mowers
Lawn Ornaments
Lawn Planting
Lawn Tools
Outdoor Growing
Overall Landscape Planning
Pests, Weeds & Problems
Plant Basics
Rock Garden
Rose Garden
Shrubs
Soil
Specialty Gardens
Trees
Vegetable Garden
Yard Maintenance
How to Harvest Mushroom Spores
How to Harvest Mushroom Spores. The simplest method to harvest mushroom spores is to create a spore print. These prints are composed of thousands of microscopic fungal spores. They can last for years if properly stored, and can be used to grow the next generation of fruiting mushrooms.
The simplest method to harvest mushroom spores is to create a spore print. These prints are composed of thousands of microscopic fungal spores. They can last for years if properly stored, and can be used to grow the next generation of fruiting mushrooms.
Things You'll Need
Laminated index card
Disposable gloves
91% isopropyl alcohol
Cotton balls
Sharp knife, such as x-acto
Clean work space
Viable mushroom
Clean cup or glass
Plastic bag, sealable, larger than index card
Making a Spore Print from a Viable Mushroom
Begin the process of spore harvest only when the mushroom is ready. For most mushrooms, this is shortly after the edges of the cap have separated from the body of the stalk--a process called "veiling." Be sure your work station is completely clean before beginning.

Place the laminated card in the center of your work area. You can laminate an index card yourself by smoothly covering one or both sides with packing tape. The goal is to create a smooth, non-porous surface on which the mushroom cap will lie.
Put on the disposable gloves.
Wipe down the laminated card with the alcohol using the cotton balls. Wait five minutes before proceeding for the alcohol to evaporate.
Remove the mushroom cap from the stalk. In most mushrooms you can gently twist the cap off. If necessary, you can use a sharp knife to cut the stalk close to where it meets the cap.
Place the mushroom cap right-side up on the sterilized index card.
Quickly cover the card and cap with a clean cup or glass placed upside-down. Make sure that the rim of the cup is flush with the work surface and that no air can enter.
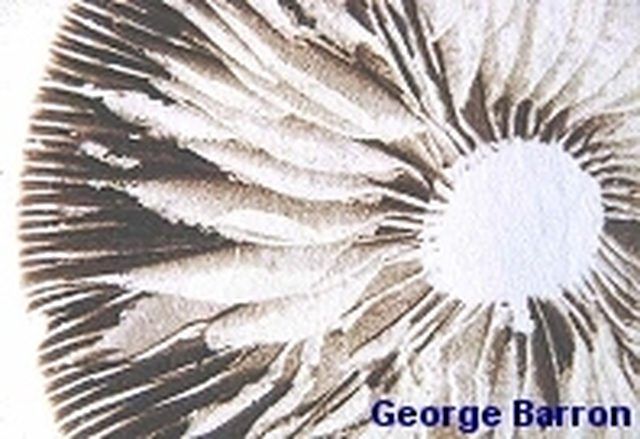
Leave the cup, mushroom cap and card for 12 hours. In this time, many thousands of spores will fall from the "gills" at the underside of the cap. Though each spore is too small to see, they will pile up to form visible mounds.
Lift away the covering cup and the mushroom cap. Carefully slide the laminated card, now bearing the mushroom spores, into the plastic bag. Take care not to scrape the spore location against the sides of the bag as you store it.
Seal the bag.
Tips & Warnings
The color of the spores will vary depending on the type of mushroom. Some mushrooms, such as morels and false morels, eject their spores using tiny jets. You should expect to find these spores around the cap as well as beneath it.
To propagate your own mushrooms after harvesting the spores, you will need a spore syringe.


