Bulbs
Flower Basics
Flower Beds & Specialty Gardens
Flower Garden
Garden Furniture
Garden Gnomes
Garden Seeds
Garden Sheds
Garden Statues
Garden Tools & Supplies
Gardening Basics
Green & Organic
Groundcovers & Vines
Growing Annuals
Growing Basil
Growing Beans
Growing Berries
Growing Blueberries
Growing Cactus
Growing Corn
Growing Cotton
Growing Edibles
Growing Flowers
Growing Garlic
Growing Grapes
Growing Grass
Growing Herbs
Growing Jasmine
Growing Mint
Growing Mushrooms
Orchids
Growing Peanuts
Growing Perennials
Growing Plants
Growing Rosemary
Growing Roses
Growing Strawberries
Growing Sunflowers
Growing Thyme
Growing Tomatoes
Growing Tulips
Growing Vegetables
Herb Basics
Herb Garden
Indoor Growing
Landscaping Basics
Landscaping Patios
Landscaping Plants
Landscaping Shrubs
Landscaping Trees
Landscaping Walks & Pathways
Lawn Basics
Lawn Maintenance
Lawn Mowers
Lawn Ornaments
Lawn Planting
Lawn Tools
Outdoor Growing
Overall Landscape Planning
Pests, Weeds & Problems
Plant Basics
Rock Garden
Rose Garden
Shrubs
Soil
Specialty Gardens
Trees
Vegetable Garden
Yard Maintenance
How to Build Raised Garden Beds With Corrugated Metal
These raised garden beds are the perfect way to add lovely character and functionality to your yard.
There's nothing better than walking outside and picking the sweet fruits and vegetables from your own garden in your own yard. With this corrugated metal raised garden bed, you get the best of both worlds � the wonderful garden function and a beautiful addition to your yard. What could be better?

Things You'll Need
2 x 6 x 10' cedar boards
2 x 6 x 8' cedar boards
4 x 4" x 10' cedar post
Tape measure
Table saw
Sliding compound miter saw
Drill with twist bits and screwdriver bit
Pencil
Framing square or speed square
Hammer
Chisel
Corrugated metal, new or old
Grinder or circular saw with metal-cutting blade
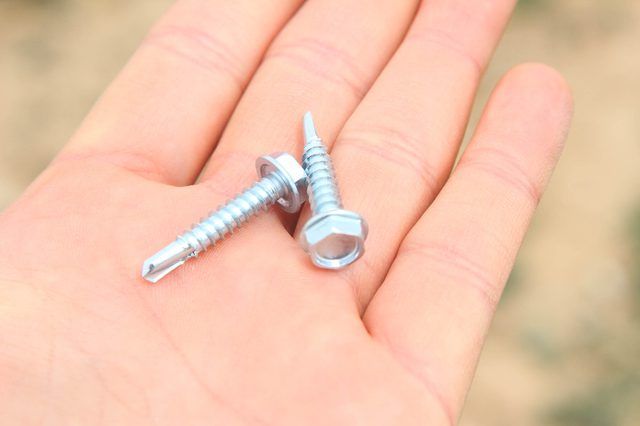
3 1/2 inch deck screws�
1 1/2 inch self-tapping screws
Landscaping fabric
Scissors
Soil
Step 1: Determine Box Size
Depending on the size of the area you have available, choose an overall length and width for your garden box. Ours is 4-feet wide x 8-feet long x 21-inches tall. The size of your box will determine how much lumber you need. Cedar is great wood choice for outdoor projects, since it is naturally resistant to rot and insect damage.
Tip
Don't make your garden box too wide, or you won't be able to reach the middle of the box from either side.
Step 2: Build the Bottom Frame
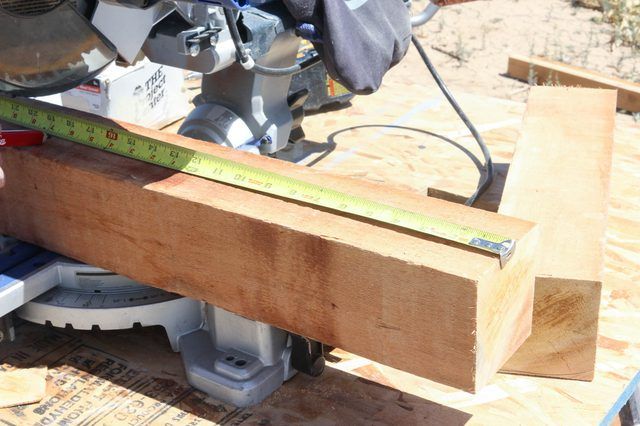
To start, begin building the frame of the garden box. Because we purchased 2 x 6 boards, we had to rip down the bottom board of the box in half lengthwise, using a table saw.
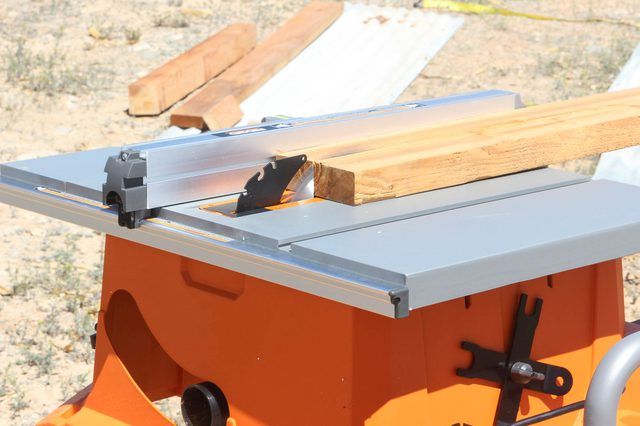
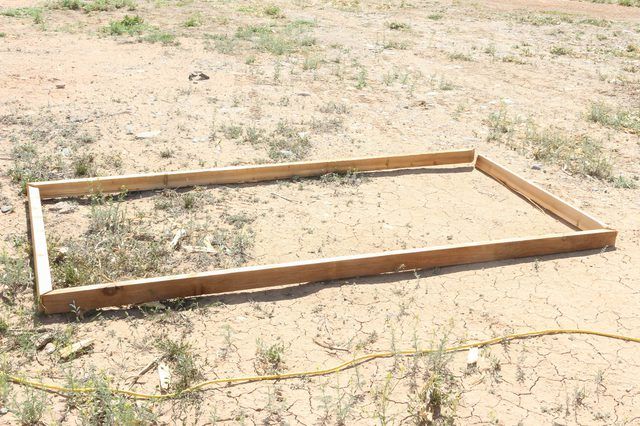
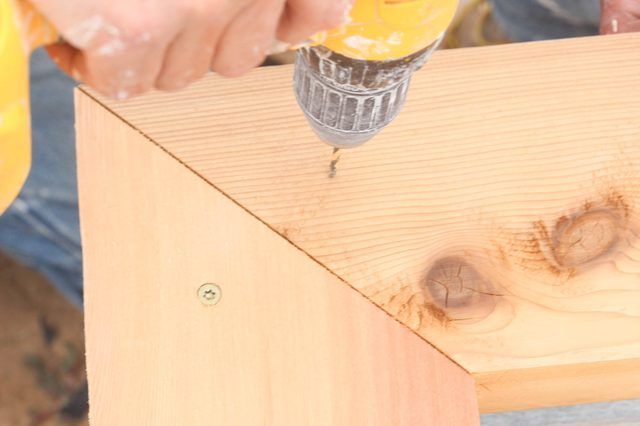
With the wood ripped down, cut two side boards 8 feet in length and two end boards at 4 feet in length, mitering the ends at 45 degrees, using a miter saw. Lay out the pieces to create a rectangle shape, as shown here.
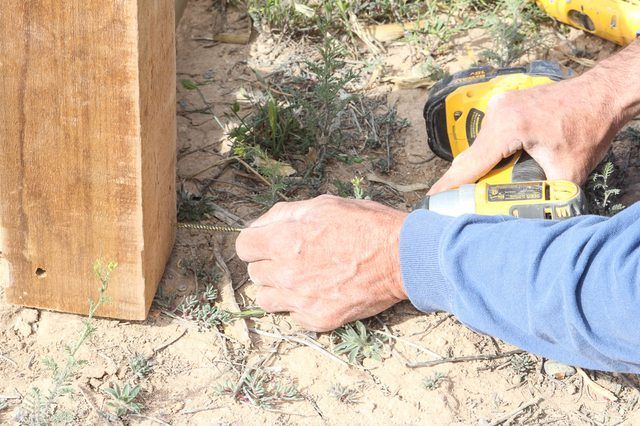
Drill pilot holes at the corner joints, using a 1/8-inch twist bit. The pilot holes will prevent the wood from splitting when you drive screws.
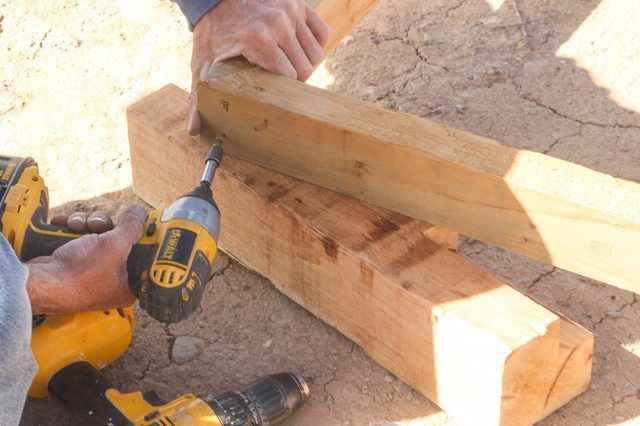
Then use two 3 1/2 inch deck screws to secure each corner.
Follow the same pattern on all four corners to create a sturdy bottom frame.
Step 3: Cut & Notch the Corner Posts
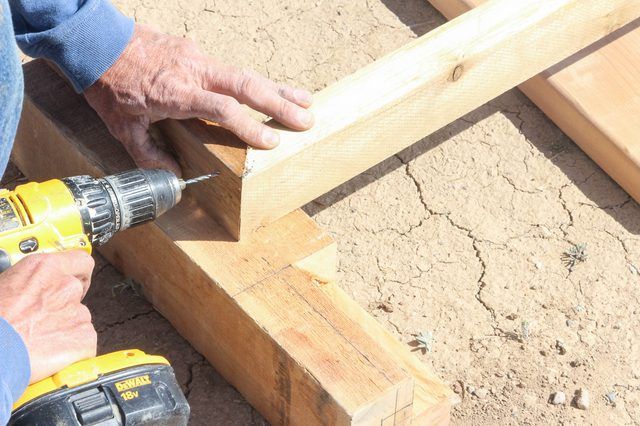
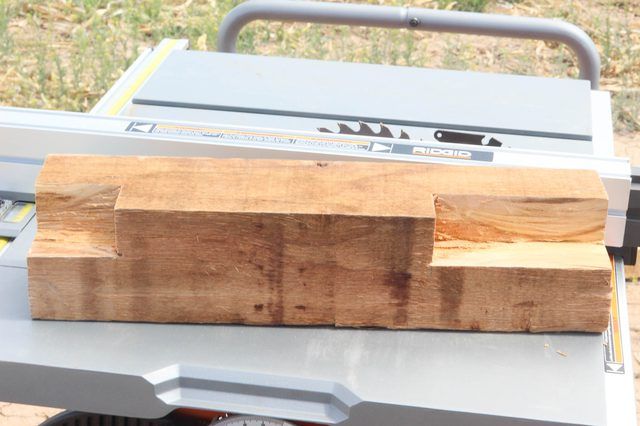
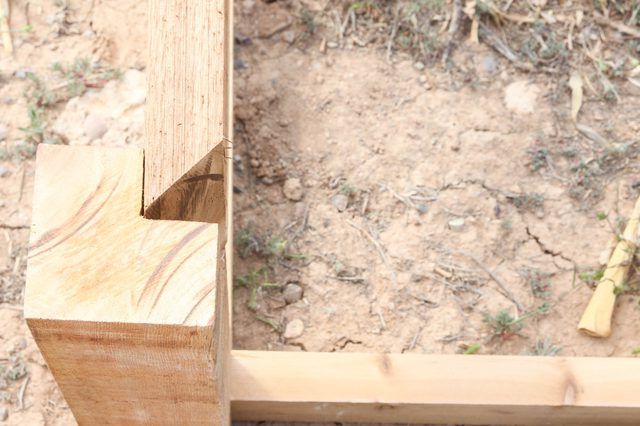
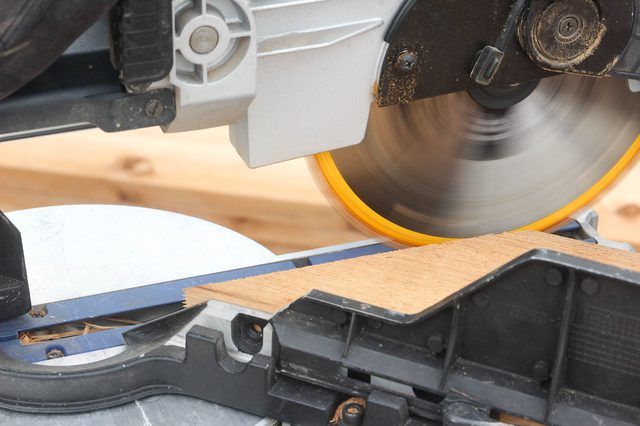
Now you will create the four corner posts for your raised bed. For a cleaner look and sturdy construction, we opted for a design that will mortise the top and bottom frame into notches cut into the 4 x 4 posts. Begin by cutting four corner posts from the 4 x 4s at 18 1/2 inches in length.
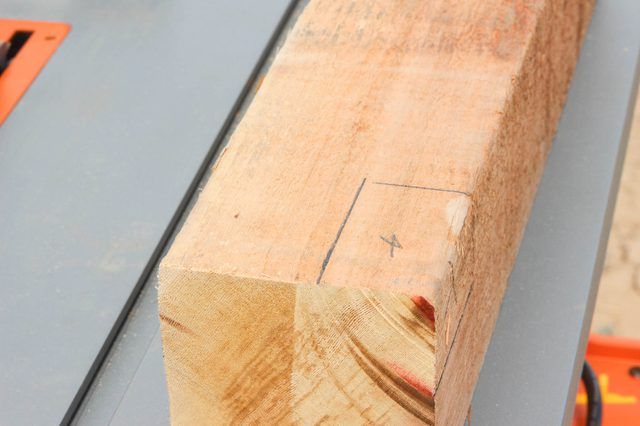
Now, cut the notches where the 2 x 6 top rails will fit into the posts. Use a 2 x 6 board as a template to outline the notch on the post. Remember that a 2 x 6 board is actually somewhat smaller than those nominal dimensions � 1 1/2 inches x 5 1/2 inches, which will be the size of your notches.
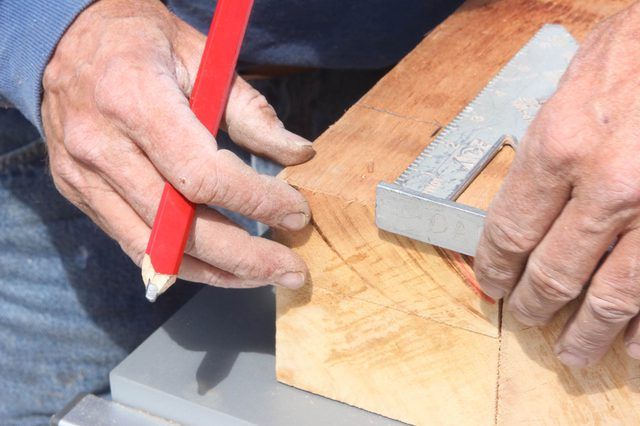
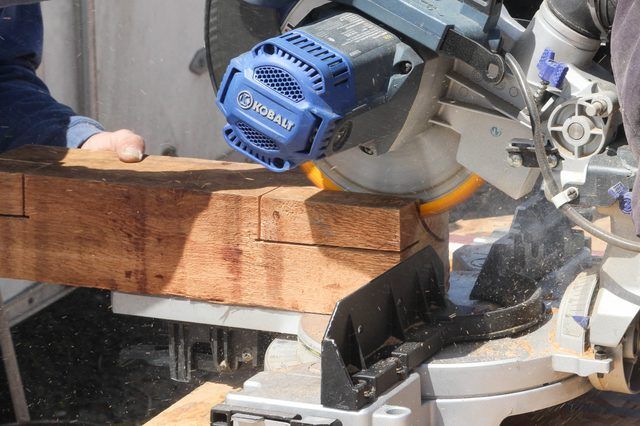
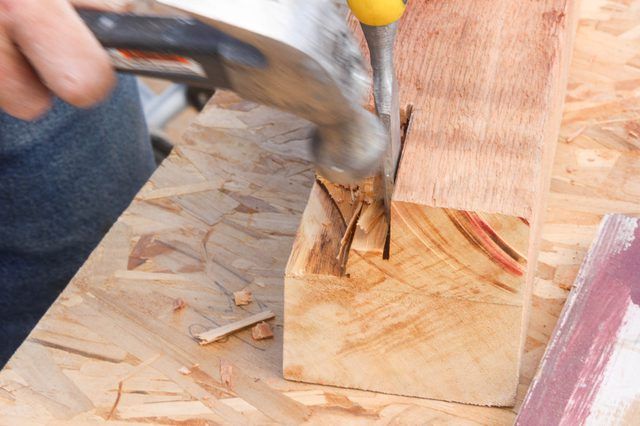
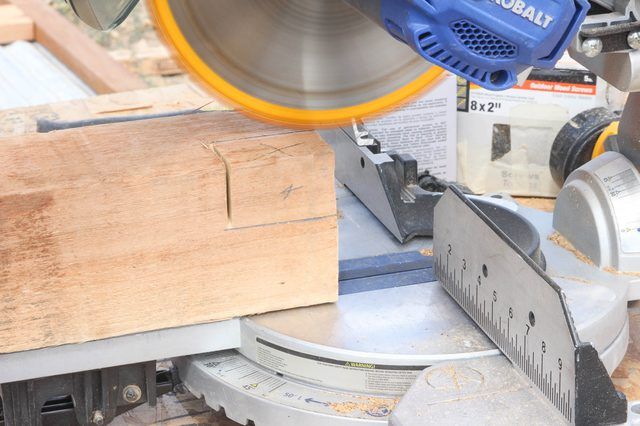
With the rail outline drawn on the post, use a miter saw to make the necessary cuts, down to the depth of the outlines. The saw won't go all the way through the block, but it will cut deep enough along the outline to allow you to knock out the corner and finish the notches with a hammer and chisel.
With the corner piece cut, pull out the separated wood.
This is what it will look like:
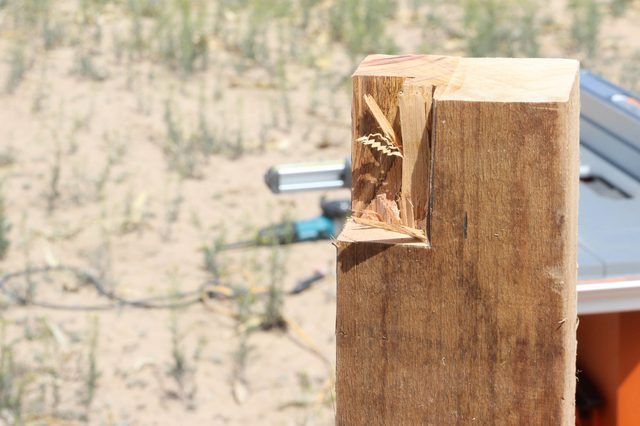
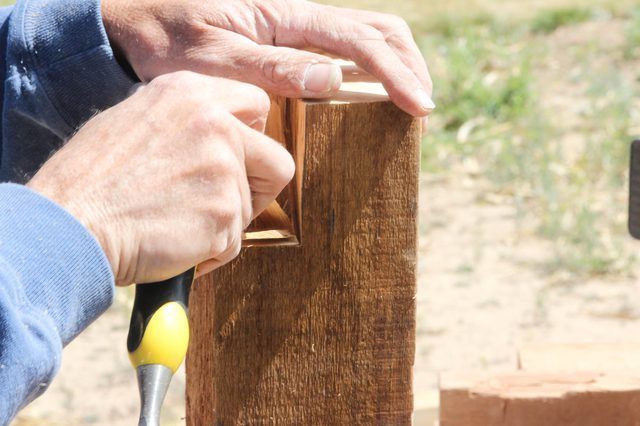
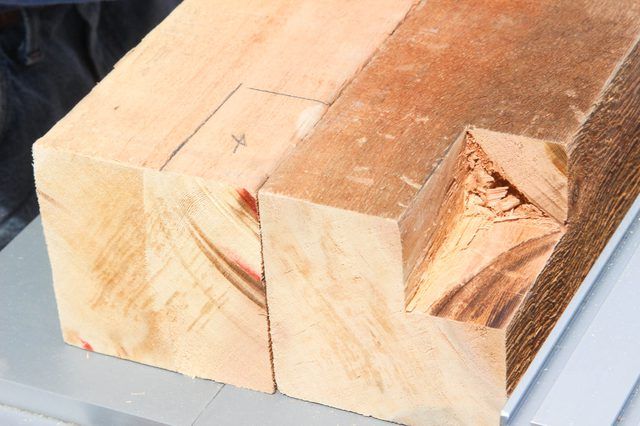
For a clean, smooth square corner, use a hammer and sharp chisel to cut out the remaining wood and square off the notches. The notch needs to be perfectly smooth and square to allow the top rails to fit.
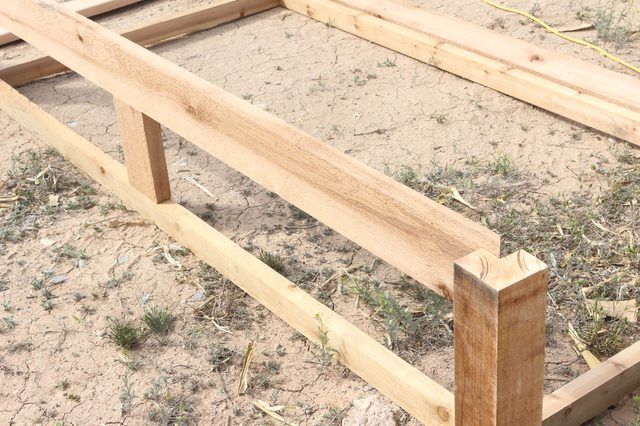
Next, cut the notches for the lower bottom rails. These are made from smaller lumber pieces, so they will require smaller notches. Use the bottom frame pieces as guides to mark your notches at the bottom of the posts, then cut and finish the notches in the same manner you used for the top notches.
Again, use the saw to score the wood along the outline.
Use the hammer and chisel to remove the corner and square off the notches. When both sides are notched, you'll be left with this:
Tip
Use the first corner post as a guide to mark the rest of our posts. The marking process will go much faster this way.
Step 4: Add the Corner Posts to the Bottom Frame
With the corner posts cut and notched, begin attaching them to the bottom frame.
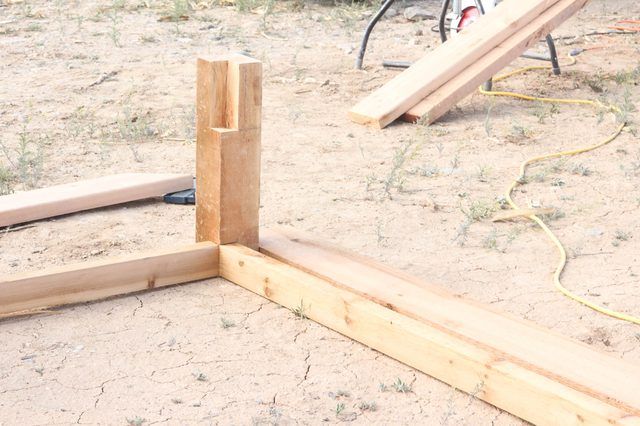
Position the first post upright on one corner of the bottom frame so the notches fit tightly over the frame. Use a square to make sure each corner is straight and square to the frame.
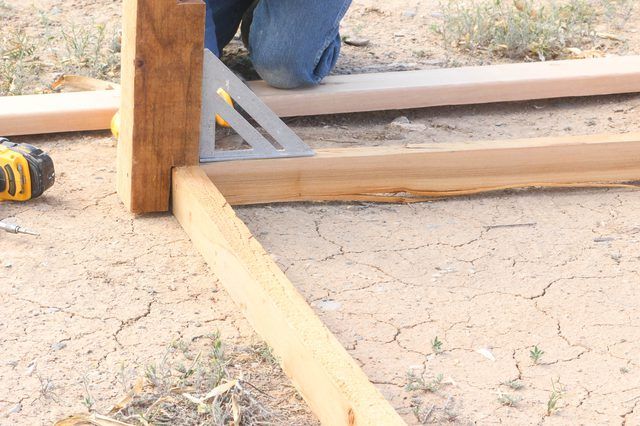
Drill pilot holes, and use the 3 1/2 inch screws to attach the posts to the the bottom frame.
Follow the same pattern until all four sides are attached.
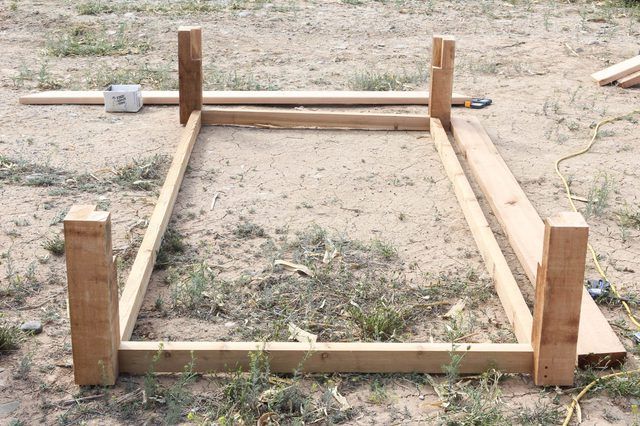
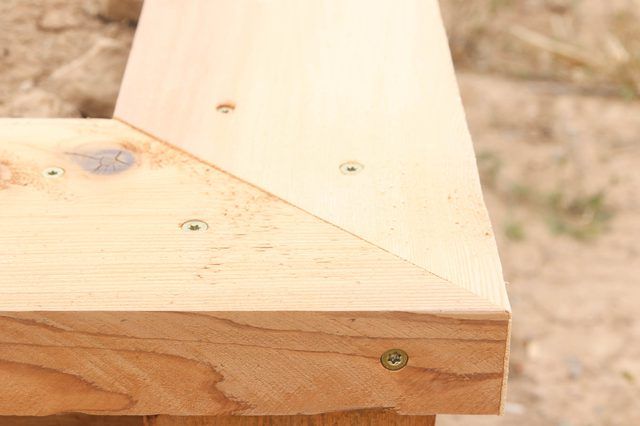
Next, add the side rails. Cut the two 2 x 6 boards to 8 foot lengths, and two to 4 foot lengths, bevel-cutting the ends at 45 degrees (this can done on your table saw or with a sliding compound miter saw). Position the 8 foot-long side boards into the post notches. Drill pilot holes and secure the posts to the rails with 3 1/2 inch screws.
Position the 4-foot end rails into the notches, then drill pilot holes and secure them to the posts with screws.
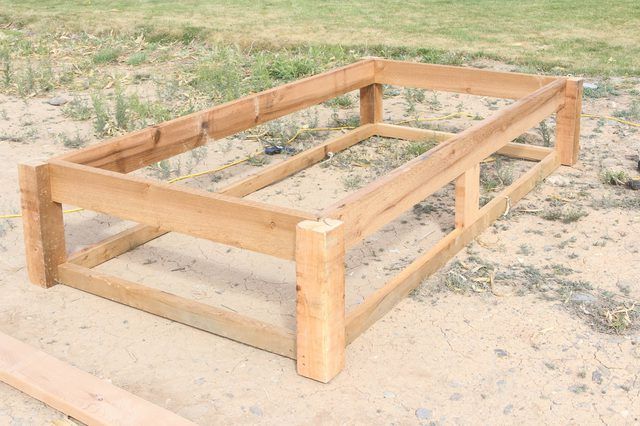
Add the side bracing on the long sides, which will make the frame a little more sturdy. Cut two 2 x 6 boards to 10-inches long. Position them on the long sides, midway between the corner posts. Secure them on the top and bottom frame members with 3 1/2 inch screws driven diagonally (known as "toe-nailing") through the side braces and into the top and bottom frame members.

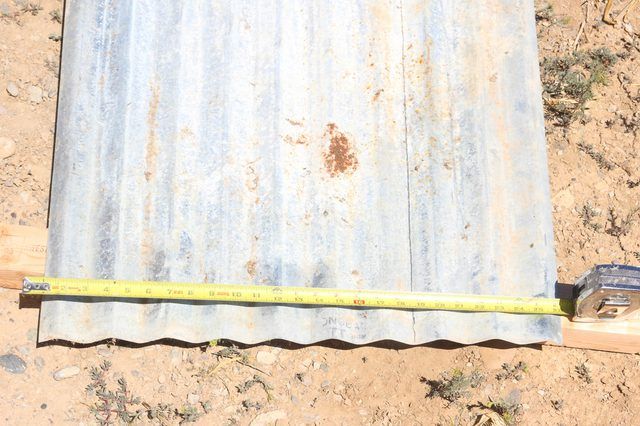
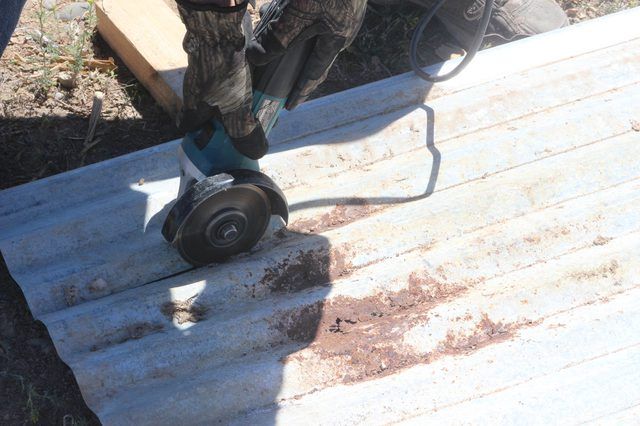
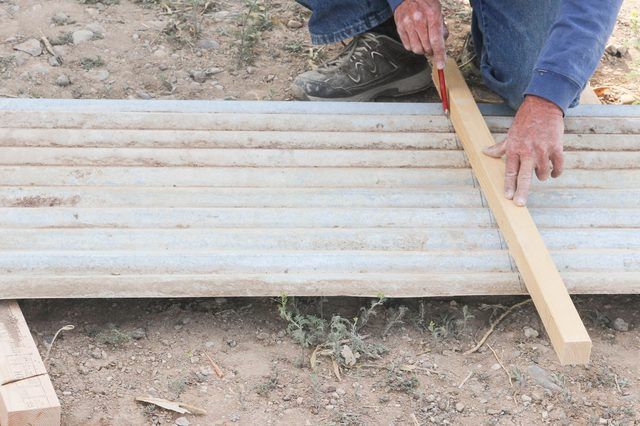
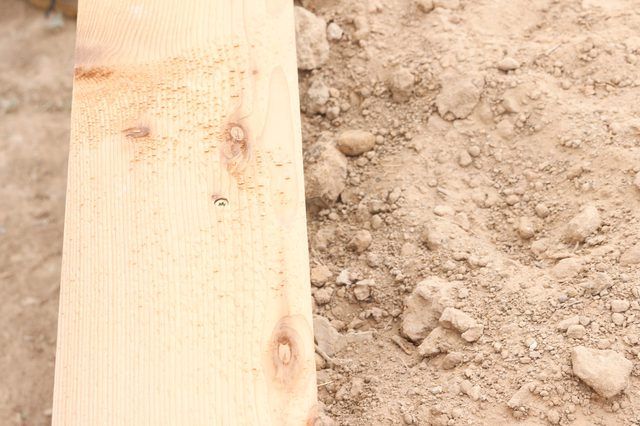
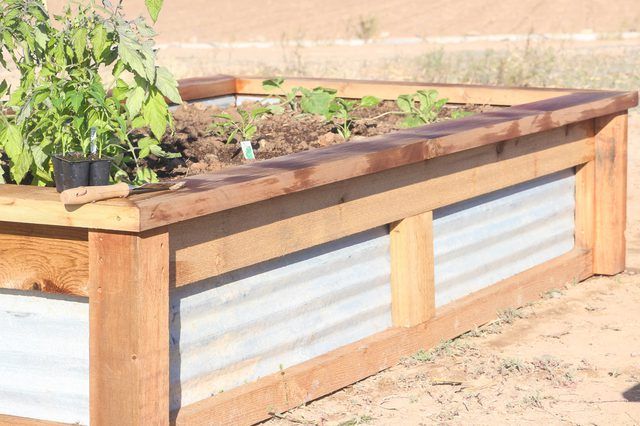
Step 5: Add the Corrugated Metal
With the frame built, it's time to add the corrugated metal panels to each side. Measure and mark the metal panel for long strips 18 1/2 inches wide.
Using a grinder or circular saw with a metal-cutting blade, cut the metal strip along the marked line.
Next, cut the strips to the proper length; in our case, this means two 4-foot lengths for the ends of the planter, and two 8-foot lengths for the long sides.
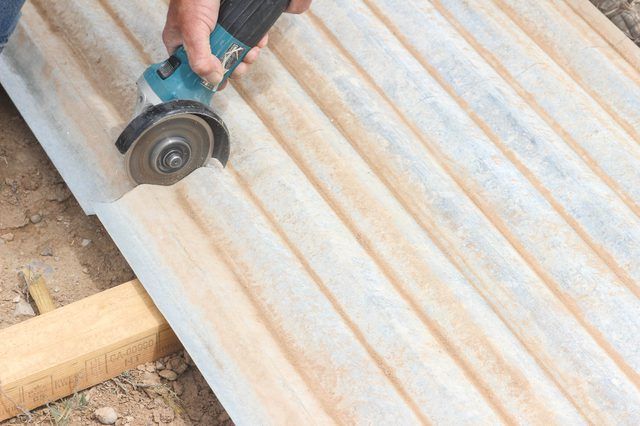
Insert the cut metal pieces into the frame on the inside of the planter. Use care, as the cut metal edges may be sharp.
Now, use the self-tapping screws to attach the metal to the wood frame. Drilling small pilot holes can make this easier.
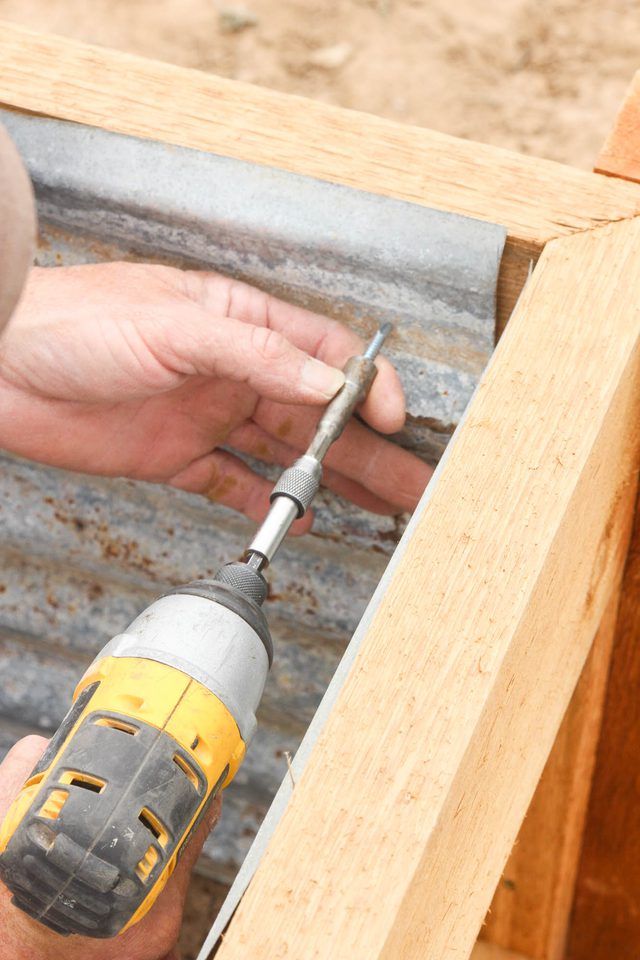
Make sure to drive plenty of screws into the top and bottom frame and into the side braces to provide plenty of support.

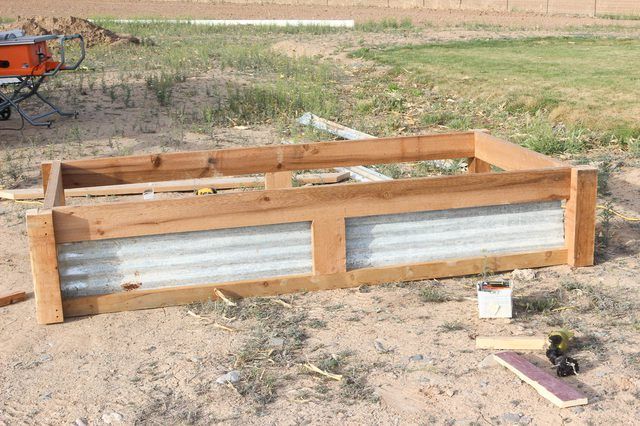
Step 6: Add the Corner Blocks
Because the metal doesn't perfectly line up straight on each corner, it may leave the edges with a slight gap. Use a piece of cedar, ripped down to 1 1/2 inches x 2 inches to reinforce the ends of the panels. Screw small boards on both sides of each corner � a total of eight strips.
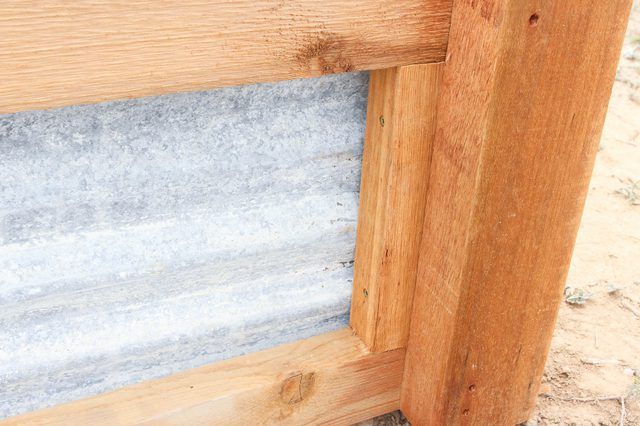
Tip
While this step certainly makes the box look more finished, it's not essential to the overall build. If your metal creates a nice corner edge, feel free to skip this step.
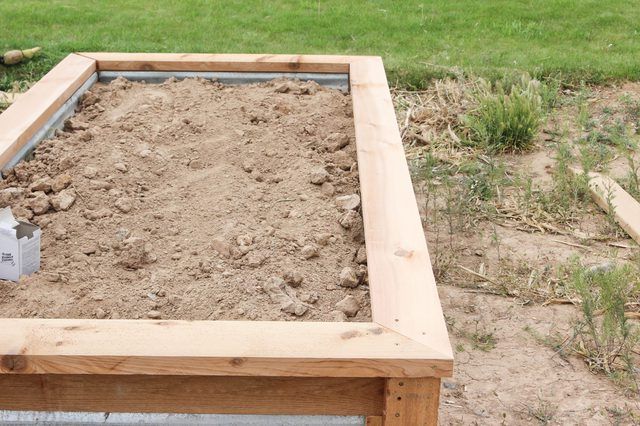
Step 7: Fill with Dirt
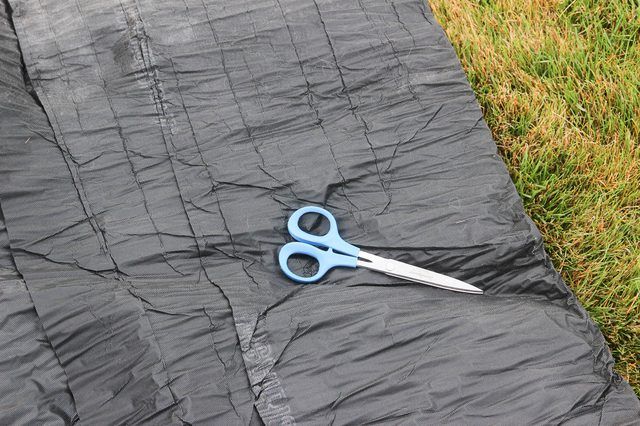
Now, you can move the planter into its final position and begin filling the box with dirt. Because the old corrugated metal we used had a few minor holes and rust spots, we used landscaping fabric to line those areas:
We simply cut the fabric to size...
Placed it in the box, and pushed the dirt up against the fabric...
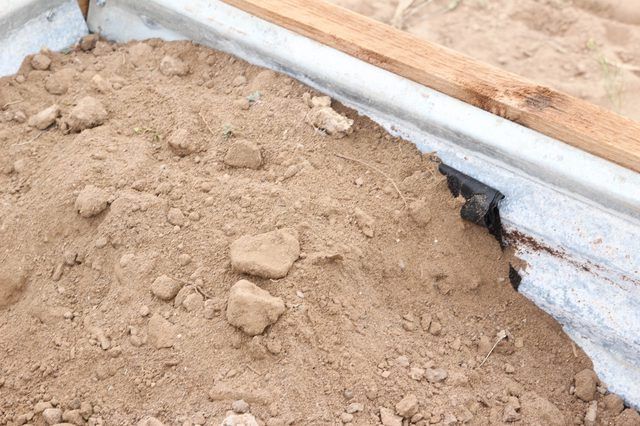
And continued filling the boxes to the desired height.
Tip
You can use any soil or dirt you like, but for best growing, it's recommended to use a packaged container soil mixture, or a mixture of top-soil and organic material, such as peat moss or compost.

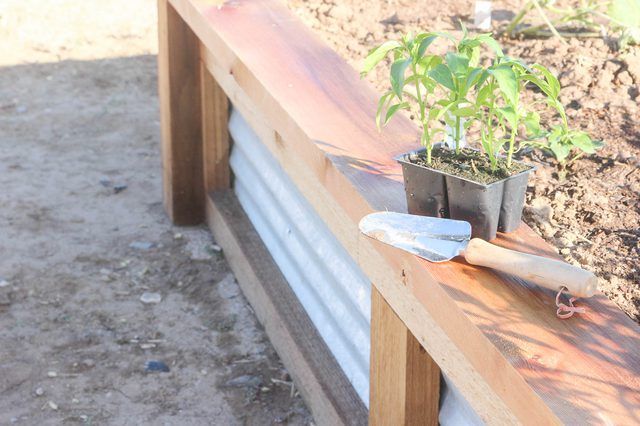
Step 8: Add the Top Cap
This step could easily be done before adding the dirt, but we decided to add the cap last. Not only does it nicely frame out the top of the box, but it also adds a nice ledge.
For the cap, we used 2 x 6 cedar boards, 10-feet long. We wanted the cap to hang over the actual frame of the box, so we added an extra 2 inches to the frame, cutting each corner piece at a 45-degree miter.
Drill pilot holes, then drive screws to secure the top cap to the frame.
We used several screws on the top, the sides, and the corners to firmly secure the cap.
Once all of the boards were installed and screwed in place, we were left with this:
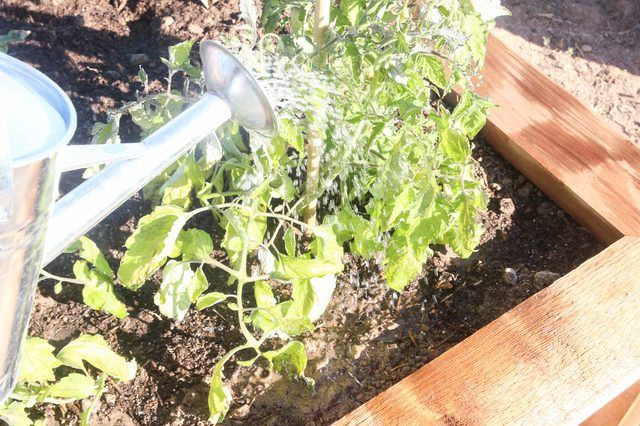
Step 9: Add Plants & Enjoy!
The final step is adding your plants and seeds!
Tip
Don't forget to add any soil amendments to if necessary!
Enjoy your new garden box!

Not only is it a practical addition, but it's also beautiful.
For maximum impact, build more than one to give a nice, cohesive look to your yard.
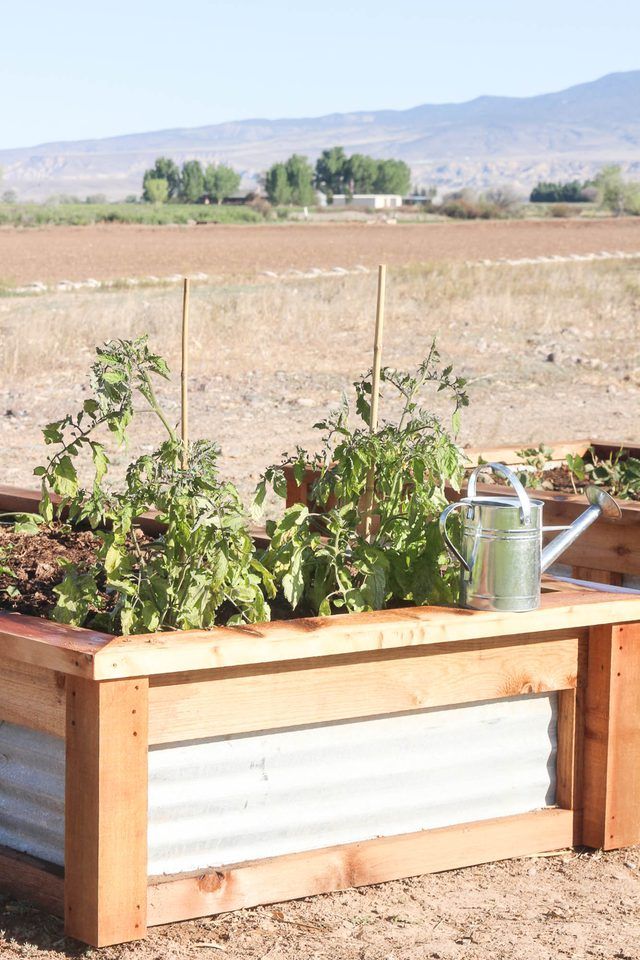
Enjoy, enjoy! And don't forget, this project can easily be customized to fit your space requirements and your garden type! Happy gardening!


